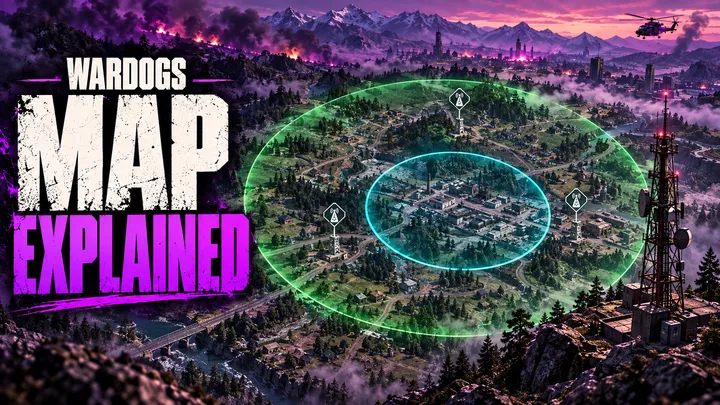
The WARDOGS map covers 256 km², yet only a random 2x2 km slice of it decides each match.
Arrive without knowing where that zone sits, or how towers steer it, and every death costs minutes of travel.
This guide explains the Control Zone, Hot Zone, tower code, the 20-point spawn vehicle and the terrain of each map.
Table of Contents
- WARDOGS Map Overview: Size, Count and Setting
- The Three Nested Scales of a WARDOGS Map
- WARDOGS Control Zone Explained
- Where the Control Zone Can Land on Each Map
- How the Hot Zone Works
- Towers and the Code System
- The Spawn Vehicle That Unlocks at 20 Points
- Terrain and Setting: Derelict Industrial Mountains
- Named Locations and Callouts
- Why Travel Is the Real Cost on the WARDOGS Map
- What Is Confirmed and What Is Not
- Key Takeaways
- Frequently Asked Questions
WARDOGS Map Overview: Size, Count and Setting
Team17’s official WARDOGS page states that every match is fought inside a randomised 2x2 km Control Zone within a 256 km² map.
A 256 km² square works out to 16 x 16 km of terrain.
The game has been in Steam Early Access since September 10, 2026, and the details below reflect the build after Patch 0.11 of September 14.
Points that rest on community data-mining instead of official documentation are labeled as such.
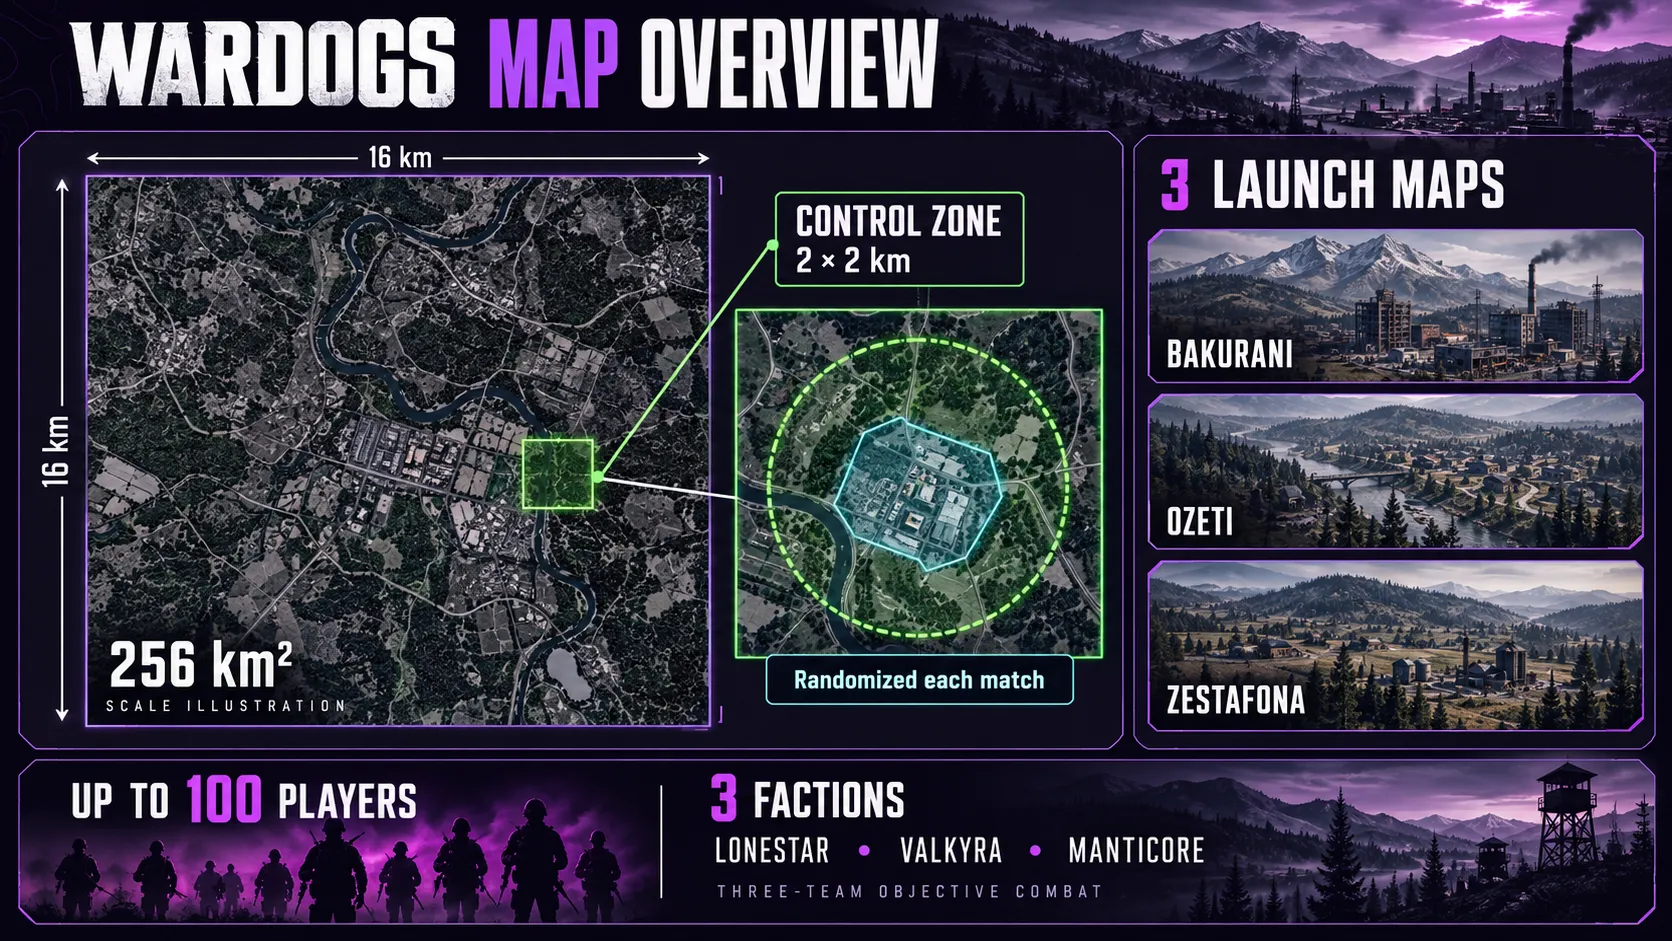
WARDOGS launched with three maps: Bakurani, Ozeti and Zestafona.
Community trackers citing Bulkhead’s August 2026 devlog report that each map has three variations, and that one more map is planned during Early Access.
Up to 100 players are split across three factions: Lonestar, Valkyra and Manticore.
Team17 describes the setting as the derelict industrial mountains of Eastern Europe.
A fan-run hub relays Bulkhead’s Steam post from February 2026, which names the fictional region Kolchia and says the war is fought over a rare resource called PV-1.
Only Bakurani sits literally in that mountain setting, since community sources place Ozeti in Western Europe and Zestafona in North America.
Team17 is direct that WARDOGS is neither a battle royale nor an extraction shooter.
For the flow of a full match, see the what is WARDOGS explainer.
The Three Nested Scales of a WARDOGS Map
Everything about how a WARDOGS map plays follows from three layers nested inside one another.
| Scale | Size | Behavior | What it decides |
|---|---|---|---|
| Battlefield | 256 km² (16 x 16 km) | Fixed per map | Logistics and travel time |
| Control Zone | 2x2 km (4 km²) | Randomized each match | Who scores points |
| Hot Zone | Smaller, shifting area | Moves inside the Control Zone | Double cash and double zone weight |
The Control Zone covers 4 km² of 256 km², exactly 1/64th of the map.
The remaining 252 km² is not an arena.
It is the approach, and every player pays for crossing it.
WARDOGS Control Zone Explained
The Control Zone is the central objective of every WARDOGS match.
It is not a flag, a capture point or a shrinking circle.
It is a large square of ordinary map terrain that happens to be where the match is decided.
Whatever the map put there, whether villages, factories, ridgelines or roads, becomes part of the fight.
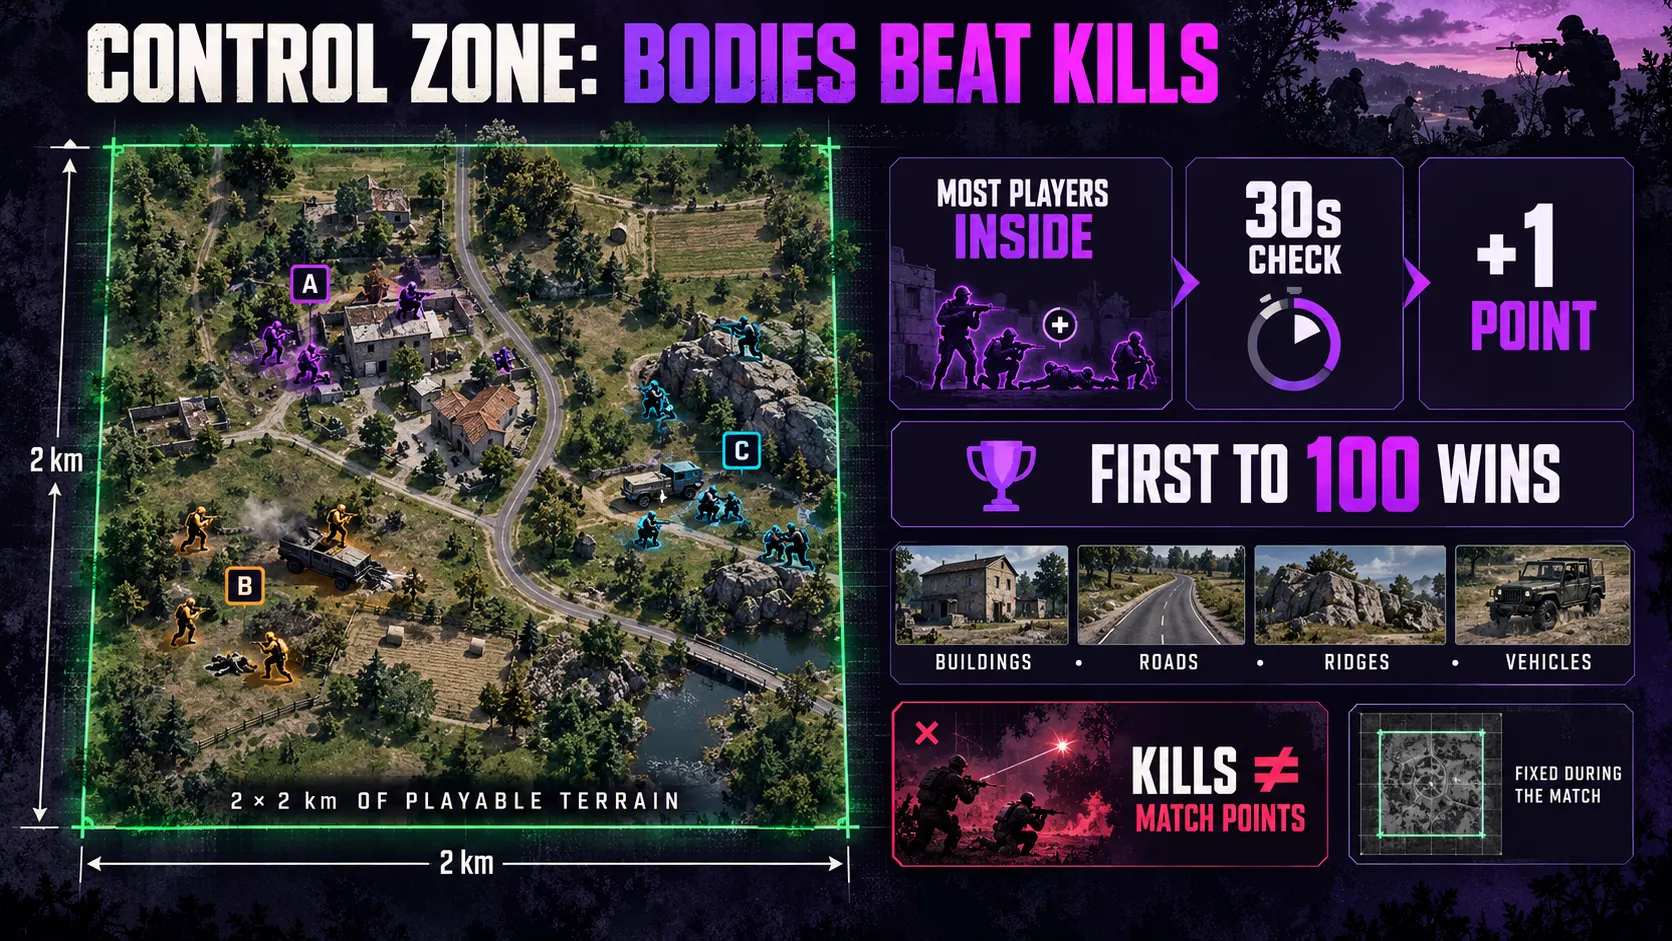
The team with the most players inside the Control Zone earns points, and the first team to reach 100 points wins, according to Team17’s game page.
Scoring is by presence, not by elimination.
The official developer FAQ on Steam Community confirms that the team with the most players inside the zone earns one point every 30 seconds.
Three teams contest one square, which changes the arithmetic compared with a two-team shooter.
Pushing too hard exposes a flank to the third faction, while turtling lets the other two split the points.
Bodies beat kills.
A team can win every firefight and still lose the match if its players are not standing inside the zone.
Because the zone is 2x2 km, holding it does not mean standing on a single pole.
Defending a building, controlling a road, operating from a ridge edge, healing teammates or driving inside the boundary all add to the head count.
For how progression tracks feed into those roles, see the WARDOGS classes hub.
For a tactical breakdown of how to actually play the zone, see the Control Zone Strategy guide.
Where the Control Zone Can Land on Each Map
Official copy calls the Control Zone randomized, and community map data adds a useful detail.
The randomization appears to draw from a small set of fixed placements on each map, not from any point at all.
That means terrain knowledge carries over between matches even though the exact location changes.
| Map | Community-mapped placements | Towers inside each placement |
|---|---|---|
| Bakurani | Default, Farmland, Lumberyard | Between 3 and 5, depending on the tracker |
| Ozeti | Three placements centered on Hillside Church 1, Hillside Church 4 and Residential 1 | 4, 3 and 2 |
| Zestafona | Default, Water Treatment, Houses (single source) | Three mapped towers |
These placements come from community trackers reading game data, not from a Bulkhead publication.
Bakurani placements
Default sits south-west of the map’s center and is the most built-up option, with apartment blocks, a residential quarter, a factory ringed with shipping containers and a hill town above.
One guide reports that Default is drawn twice as often as the other two placements.
Farmland sits north of center and is the most open circle, with wide sunflower fields and a church standing among them.
Lumberyard sits south-east of center, in wooded lumber hills, and carries the fewest towers.
Ozeti and Zestafona placements
Ozeti’s placements cluster around the hillside church terraces and the residential blocks, with the stadium and pool inside most of them.
One tracker lists four Ozeti placements instead of three, so the in-game map remains the authority for the match being played.
Zestafona’s variants are named Default, Water Treatment and Houses in a single community guide, which points to an industrial and residential mix.
How the Hot Zone Works
The Hot Zone is a smaller, shifting sub-zone inside the Control Zone.
Team17’s page confirms the double-cash side, while the double head-count comes from community guides, since the official developer FAQ on Steam Community covers scoring but not the Hot Zone.
Two things change at once for a player standing inside it.
Community guides report that each player counts as two toward the team’s zone count.
Cash earned is doubled.
If the double count holds, the effect is larger than it sounds, because ten players inside the Hot Zone outscore nineteen players standing elsewhere in the Control Zone.
That is why the Hot Zone is the most contested ground on the map, and why everyone else is standing there too.
The Hot Zone moves during the match, so holding it is a moving problem rather than a fixed defense.
No published figure was found for its size, its movement speed or how long it stays after a tower pulls it.
Cash persists between matches, so double income in the Hot Zone compounds into what a player can afford later in the session.
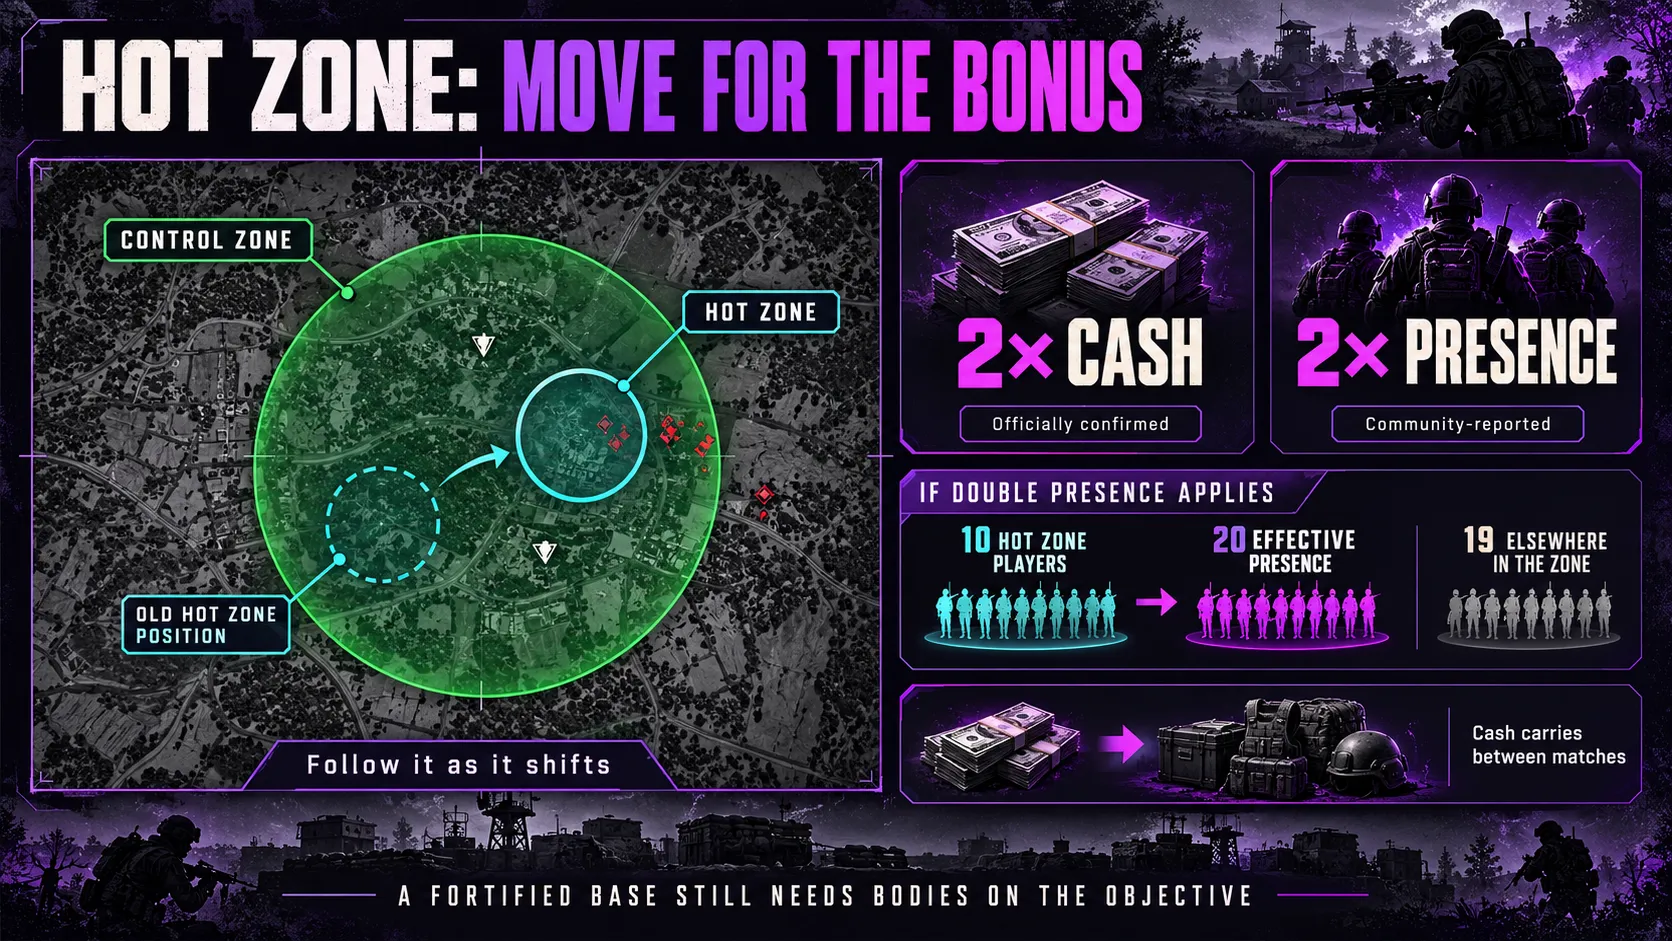
One community wiki warns that teams which build endlessly at a base can leave the Hot Zone empty and lose anyway.
Towers and the Code System
Towers are the one part of the match a team can steer.
They are fixed structures on each map, and each has an operations room with a main console.
Only towers inside the active Control Zone are contested, according to several community trackers, and the rest are just good viewpoints.
One fan hub reports that Bulkhead has never published tower names, and community guides call them towers, drill towers or sniper towers.
How a tower is captured
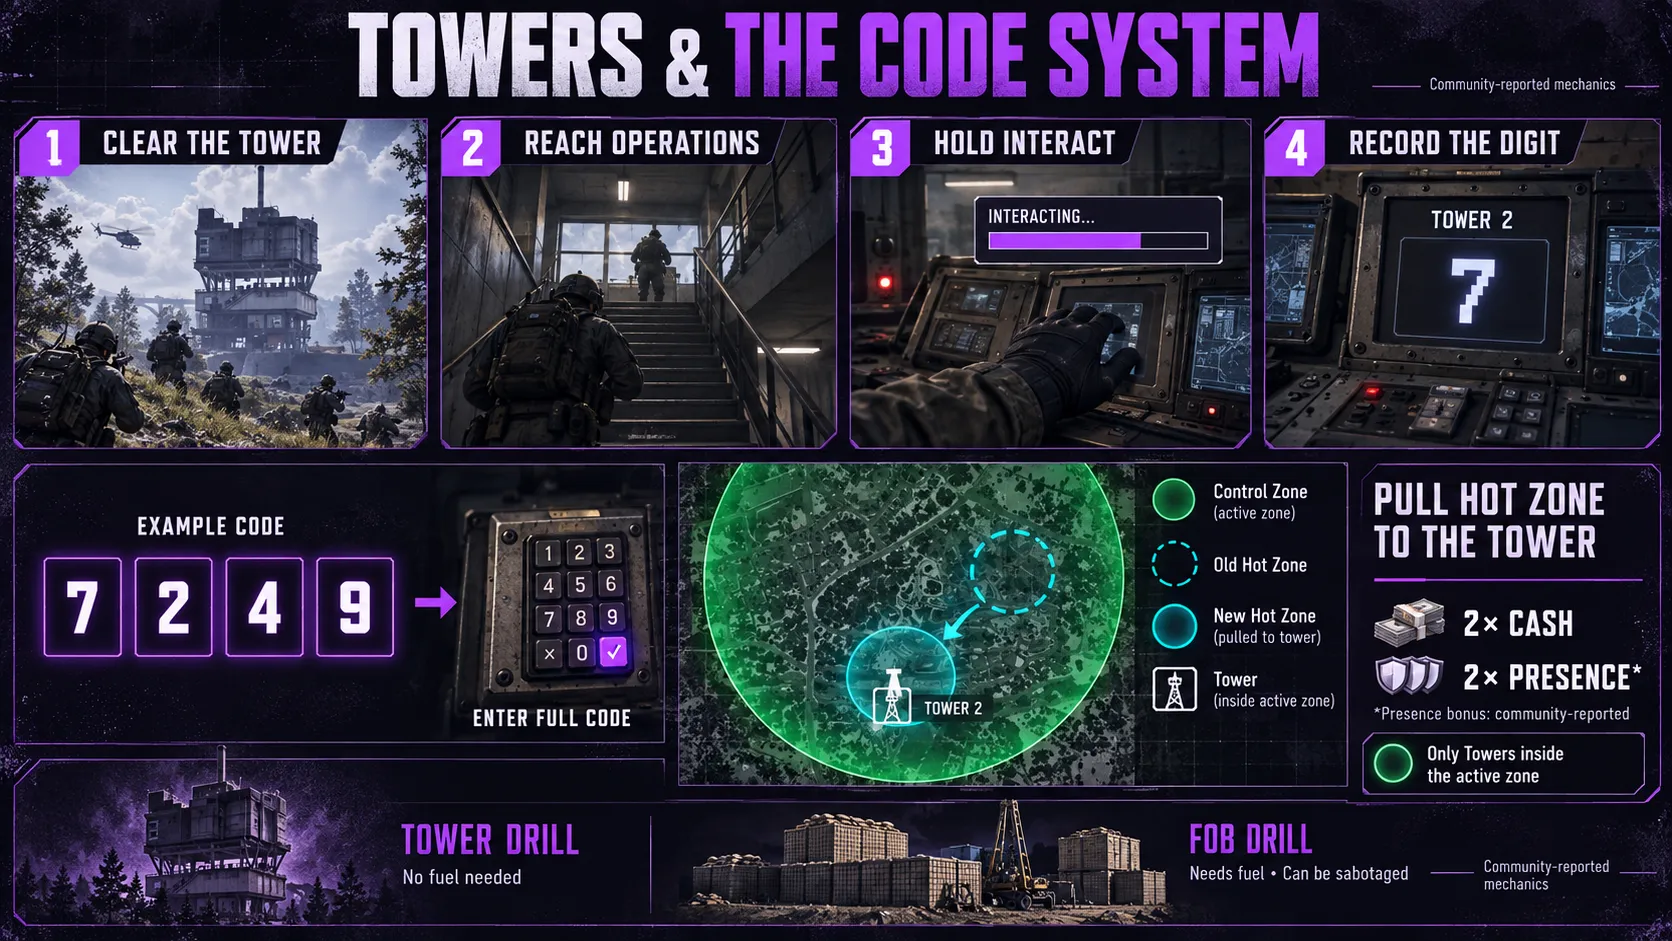
Community guides describe the capture in a consistent sequence.
- Clear the tower. Enemy players inside must be dead or gone.
- Go up to the operations room. It sits on the floor above the entry, near the staircase.
- Hold interact at the main console. The capture bar fills and the tower switches to the faction’s color.
- Note the digit. Each capture reveals one digit of the code, and one guide adds that the console shows its position in the sequence.
One guide reports that every tower starts the match on a 10-minute cooldown, and guides agree that a tower locks briefly after it changes hands.
These steps come from beta and early launch reporting and are not confirmed by Bulkhead.
The four-digit code
Each captured tower reveals one digit of a four-digit code.
Once a team holds all four, it enters the code at the keypad beside a tower’s main console.
Entering the full code activates the Hot Zone magnet, which pulls the Hot Zone toward that tower.
The result is double cash and double zone weight landing on ground the team chose and can fortify.
One guide reports that players get two attempts at guessing missing digits before a short lockout, and another notes that a team with only three digits can try a guess.
The pull lasts for a limited time, and Bulkhead has not published how long.
Tower drill versus FOB drill
A fuelled drill built at a forward operating base (FOB) is an alternative magnet.
Community guides report that a FOB drill needs fuel up to 6000/6000 and can be sabotaged, while a tower needs no fuel.
The FOB vendor price rose from $2,500 to $7,500 in Bulkhead’s Season 1 changelog, which described the change as making FOBs “more of a choice.” The FOB building guide walks through the full build order.
Towers also matter beyond the code, since their roofs are reported to spawn randomized equipment and their height suits a fortified position.
One fan hub reports player complaints that the tutorial does not explain towers at all, and that dug-in teams with a recon on the roof are hard to move.
For a dedicated walkthrough, see the WARDOGS towers guide.
The Spawn Vehicle That Unlocks at 20 Points
Once any team in the match reaches 20 points, all three teams receive an armored spawn vehicle at their base.
Community guides identify it as an M113 APC SV, and it is not sold at the vendor.
A player selects it on the map through the Deployment Board at HQ and spawns onto it after a short countdown.
The vehicle has to be driven toward the Control Zone and parked, because it is not a valid deployment point while moving.
The driver earns cash and XP for every player who spawns on it, which makes delivering it one of the better passive earners.
Only the player who drives it out earns the spawn income.
The vehicle has a weak point, described as a small radar or satellite dish on the roof.
Shooting the dish off disables the vehicle until it is repaired, and one guide reports that enemies can also hack it.
Sources disagree on the per-player cooldown between uses, with reports ranging from several minutes to roughly 10 minutes.
The 20-point threshold is corroborated across independent guides, while the cooldown and hacking details are not.
The vehicle matters because of the map size described above.
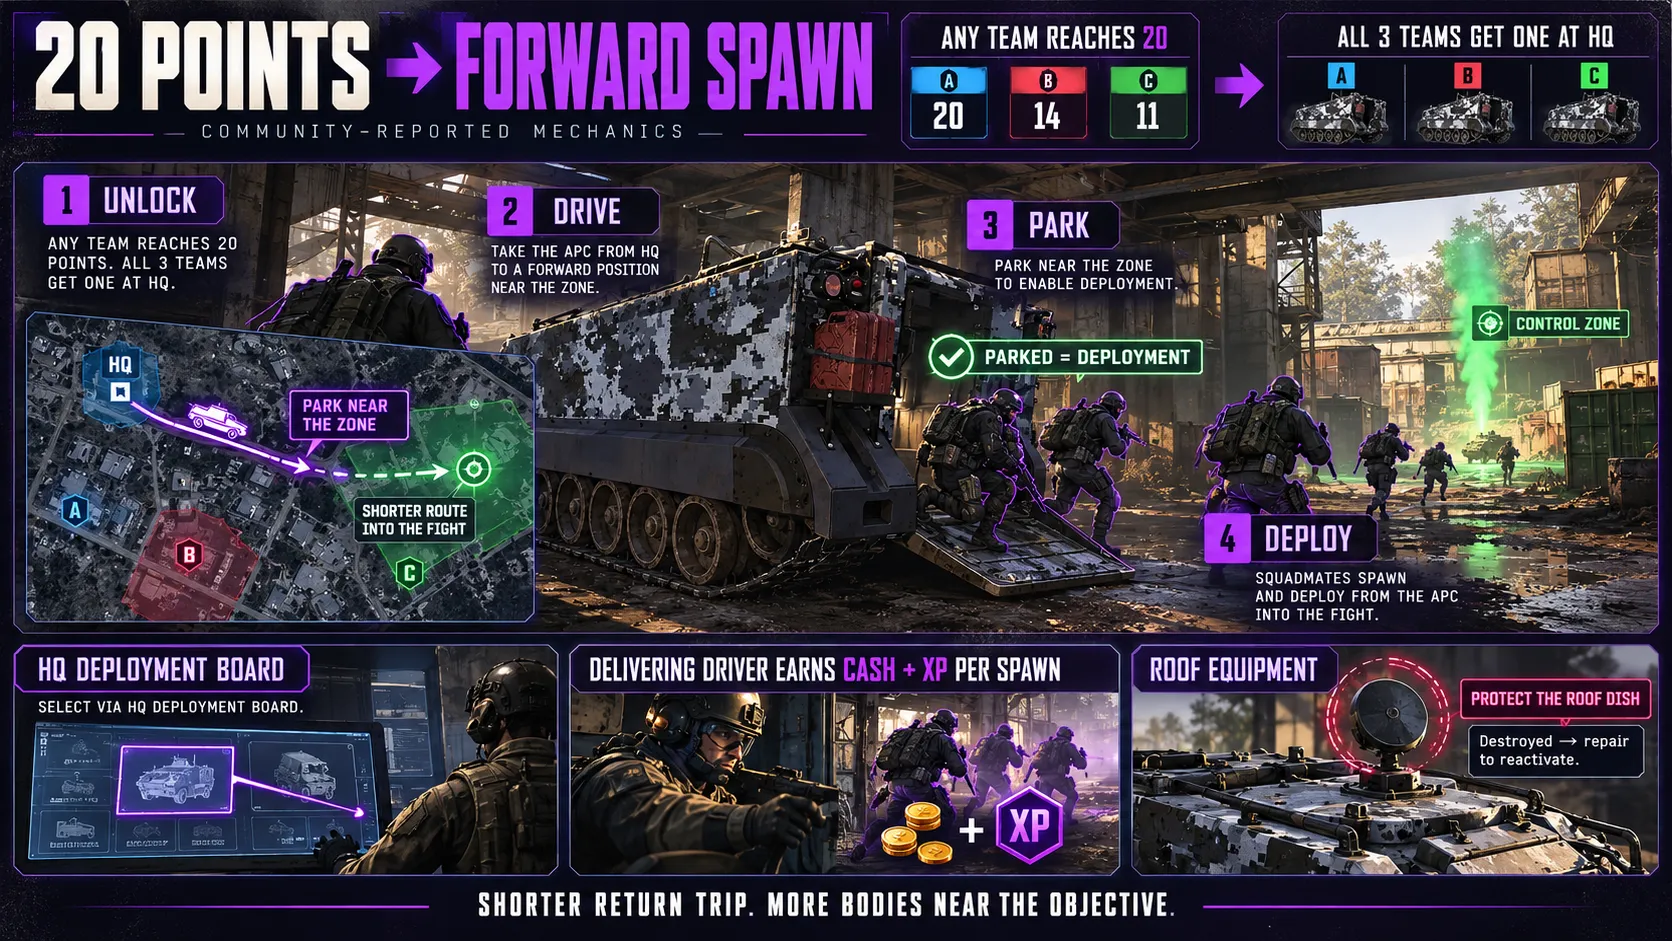
On a 256 km² battlefield, a forward spawn shortens the trip back to the fight by minutes.
For the wider vehicle roster and how to destroy them, see the vehicle destruction guide.
Terrain and Setting: Derelict Industrial Mountains
The setting is derelict industrial mountains, and each map interprets it differently.
Bakurani: the mountain river valley
Bakurani is a river valley in the Eastern European mountains, with a factory district on the valley floor and forested ridges climbing steeply on both sides.
One community guide adds snow-capped peaks to the north and open farmland to the south.
The canopy above the treeline is dense and near continuous, which hides movement.
The valley road is the only sustained flat route across the map, so it is both the fast way in and the obvious place for an ambush.
That makes the high ground on either side of the road the central argument on Bakurani.
Ozeti: the hill town
Ozeti is set in Western Europe and is built around a hill town on the valley floor.
Low buildings run along one road, a walled stadium sits at one end, and a church stands on the high ground above.
Orchards, dry fields and scattered pine surround the town.
Cover is thick inside the town and close to absent on the open approaches, so getting there is the hard part.
Zestafona: the industrial North American map
Zestafona shifts the conflict to North America.
Most community descriptions place it along a winding river bend with warehouses, brick buildings, rail infrastructure, farmland and forest.
Earlier pre-launch descriptions called it arid high country with bare ridges and almost no canopy, so accounts of its layout vary between sources.
Availability is also inconsistent, since one tracker listed Zestafona as playable on September 13 while another listed it as not yet playable a day later.
Confirm in the client that Zestafona is in the current rotation.
A destructible battlefield
Team17 states that apartment blocks can be destroyed with rocket launchers and that tanks can tear through towns.
The layout described above therefore changes as a match progresses.
Named Locations and Callouts
Named locations exist on all three maps, although Bulkhead has not published an official callout list.
The names below come from community tools that read them from game data, so they are accurate to a build rather than guaranteed.
Bakurani callouts
- Central belt: Hill Town, Apartments, Residential, Market Swamp, Bridge Hill
- Sunflower fields: Sunflower Church, Sunflowers Center, Sunflowers North, Sunflowers South
- Lumberyard district: Lumberyard North, Lumberyard South, Lumberyard House, Lumber Hills
- Elevated positions: Green Mountain, West Hill Woods, Hillside Top
- Landmarks: Containers and Factory, Water Silos, Forest Quarry, North River
Community tools count roughly 60 named zones on Bakurani, spread across towers, settlements, industrial sites and terrain.
Ozeti callouts
- Stadium complex: Stadium, Stadium Front, Stadium Parking, Stadium Garages
- Hillside Church: six connected terraces plus Church Top
- Urban core: Apartments, Apartment Garages, Shops 1 and 2, Pool, Lumberyard
- Open ground: Farm 1 to 9, Grassland, Deforested, Forest 1 to 13
- Residential blocks: Residential 1 to 9
Trackers list about 55 control areas and four towers on Ozeti.
Zestafona callouts
- Warehouse core: Warehouses 1 to 8, Brick Warehouses, Warehouse Small
- Heavy industry: Factory Large 1 and 2, Shipping Exports
- Rail network: Train Tracks, Train Shed 1 and 2, Bus Depot
- Verticality: Offices, Apartments, Water Tower 1 and 2
Water Towers are treated as landmarks in community data, not as capture objectives.
Numbered callouts such as “Tower 3” or “Bridge Hill” only work as shared shorthand if the whole squad has learned where they sit.
Why Travel Is the Real Cost on the WARDOGS Map
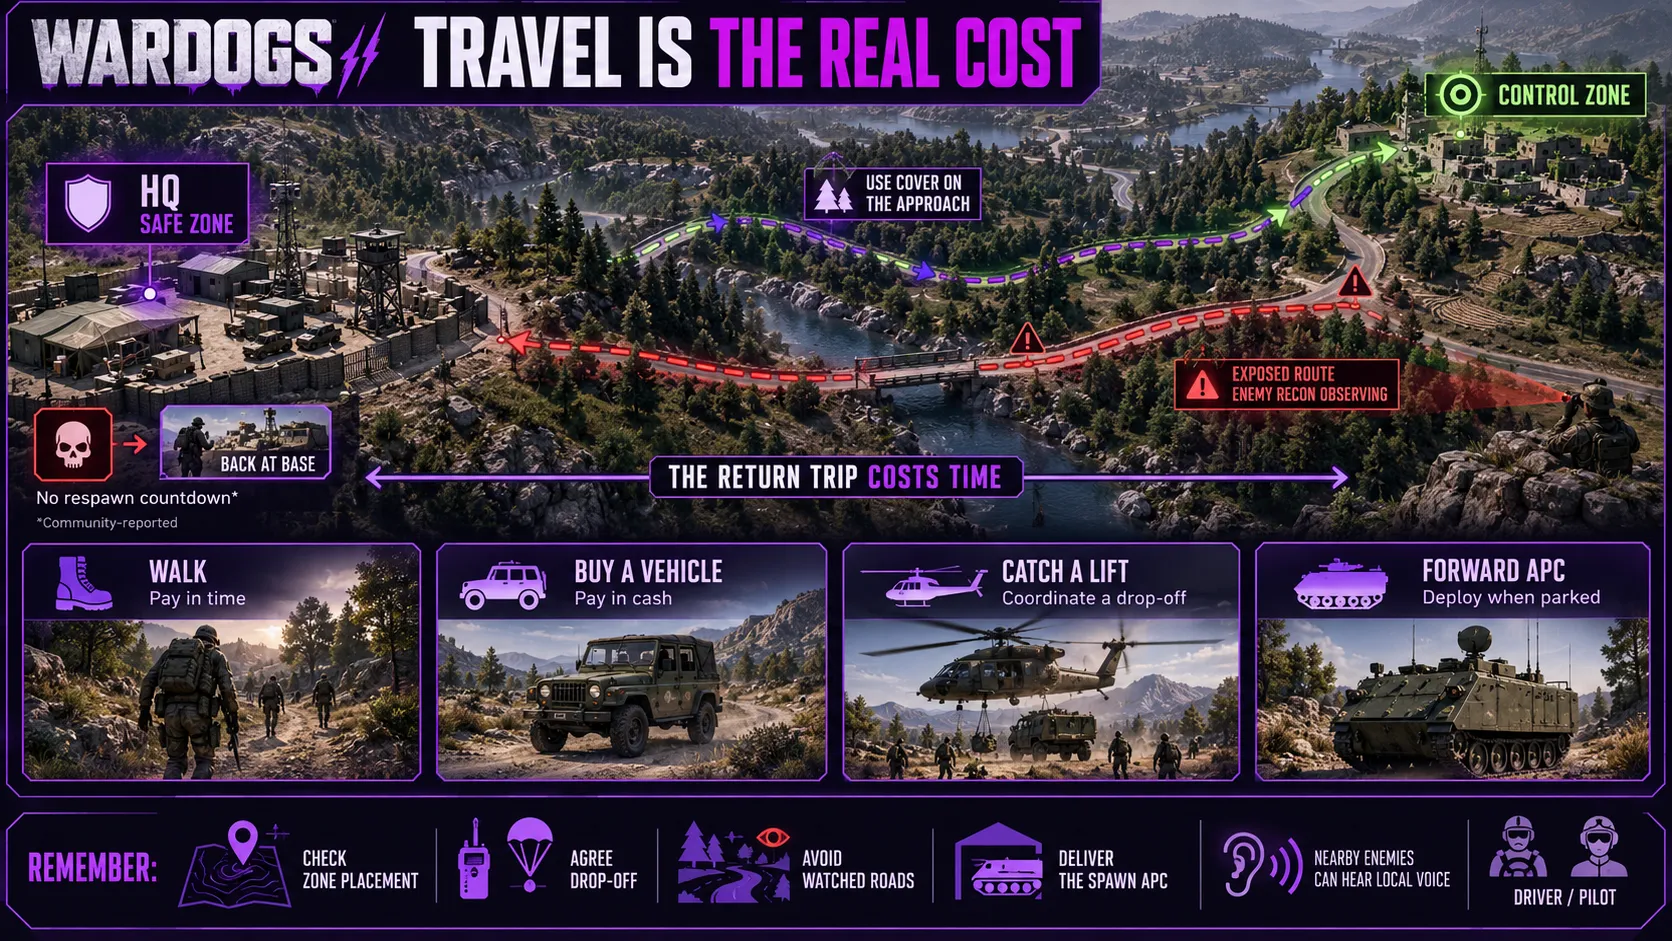
WARDOGS has no respawn countdown.
According to Bulkhead’s August 2026 devlog as relayed by community sources, a dead player returns to the safe zone at base, and the clock that matters is how long it takes to get back to the Control Zone.
Travel time is the punishment for dying, and the design is deliberate.
That is why transport is a purchase decision and not a spawn option.
Buying a vehicle, catching a lift from a pilot or driver, spawning on the APC or walking and arriving late are all trade-offs paid for in cash or minutes.
Driver and Pilot exist as full progression tracks for this reason.
Practical habits that follow from the map design:
- Read the active placement before committing to a route. The zone position decides which roads and towers matter.
- Agree on a drop-off point before leaving base. Every trip to the zone is a chosen risk.
- Avoid the obvious approach when recon is watching it. A flank through scrubland or a tree line is often safer than the direct road.
- Be at base when the spawn vehicle appears. Driving it out earns spawn income and places a forward spawn sooner.
Local voice chat carries to both friendly and enemy players nearby, so callouts made on the way in can be overheard.
For loadouts that suit long approaches, see the WARDOGS weapons hub.
What Is Confirmed and What Is Not
Several map details remain in flux while WARDOGS is in Early Access.
| Claim | Confidence | Basis |
|---|---|---|
| 256 km² map, randomized 2x2 km Control Zone, first to 100 points | Confirmed | Team17 game page, Steam store page |
| Hot Zone pays double cash | Confirmed | Team17 game page |
| Hot Zone counts each player as two toward zone control | Community-reported, widely corroborated | No official page read |
| Three maps at Early Access | Widely reported | Bulkhead devlog as relayed by fan hubs |
| 30 second score tick | Confirmed | Official developer FAQ, Steam Community, Feb 9 2026 (pinned) |
| Four-digit code entered at a tower keypad | Community-reported, widely corroborated | Four independent guides |
| Tower counts on Bakurani | Disputed | Trackers list between five and seven live towers |
| Spawn vehicle at 20 points | Community-reported, widely corroborated | Independent guides and forum posts |
| Spawn vehicle cooldown | Disputed | Several minutes to roughly 10 minutes |
| Zestafona availability | Disputed | Trackers disagreed on rotation status |
One community guide also describes a 500 meter radius play area with an 85 meter scoring core, which conflicts with the official 2x2 km description, so the official figure is used throughout.
No published figure was found for the Hot Zone’s size, speed or duration, and a fourth map is planned during Early Access without a confirmed date.
One tracker also lists extra maps, including a Sniper Showdown map called Bakurani Outskirts and one called Saburtulo, which no other source confirms and which are excluded here.
Bulkhead has confirmed Season 2 for October 15, 2026, and Patch 0.11 on September 14 was a server browser patch whose published notes list no map changes.
Because Early Access builds change quickly, the map screen in the current client always takes priority over any written guide.
Key Takeaways
- 256 km² map, 4 km² Control Zone. Only 1/64th of the ground scores, so the other 252 km² is approach.
- Presence beats kills. Most players inside the zone earns points, and 100 points wins.
- The Hot Zone pays double cash and, per community guides, doubles head count. Ten players inside would outscore nineteen outside.
- Towers steer the Hot Zone. Four digits, entered at a tower keypad, pull it toward that tower.
- The spawn vehicle appears at 20 points. It must be parked before teammates can spawn on it.
- Travel is the cost of dying. Read the placement and plan the route before leaving base.
Frequently Asked Questions
How big is the WARDOGS map?
Each WARDOGS map is 16 x 16 km, or 256 km².
Only a randomized 2x2 km (4 km²) Control Zone is contested during a match.
That leaves about 252 km² of every map as approach terrain.
How many maps are in WARDOGS?
WARDOGS has three maps in Early Access: Bakurani, Ozeti and Zestafona.
Community trackers citing Bulkhead’s August 2026 devlog say each has three variations.
One more map is planned during Early Access.
What is the Control Zone in WARDOGS?
The Control Zone is a randomized 2x2 km area inside the map where each match is decided.
The team with the most players inside it earns points.
The first team to reach 100 points wins.
Is the WARDOGS Control Zone in the same place every match?
No, Team17 and the Steam store page describe it as randomized.
Community map data shows the game draws from a small set of fixed placements per map, such as Default, Farmland and Lumberyard on Bakurani.
Terrain knowledge therefore carries over even though the location changes.
What is the Hot Zone in WARDOGS?
The Hot Zone is a smaller, shifting area inside the Control Zone.
Team17 confirms it pays double cash.
Community guides report that each player standing in it also counts as two toward zone control.
How do you move the Hot Zone in WARDOGS?
Capture towers to collect the digits of a four-digit code, then enter the full code at a tower keypad.
This activates the Hot Zone magnet and pulls the zone toward that tower.
A fuelled drill built on a FOB can do the same job.
How do WARDOGS towers and tower codes work?
Players clear a tower, go up to its operations room and hold interact at the main console until the capture bar fills.
Each capture reveals one digit of a four-digit code.
Community guides report a 10-minute cooldown at match start and a lockout after two wrong code attempts.
How often does the WARDOGS Control Zone score points?
The official developer FAQ on Steam Community confirms one point every 30 seconds for the team with the most players inside the zone.
The first team to 100 points wins.
Team17’s game page also confirms the 100-point win condition.
When does the spawn vehicle appear in WARDOGS?
Once any team in the match reaches 20 points, all three teams receive an armored M113 APC SV spawn vehicle at their base.
A driver has to park it near the zone before teammates can spawn on it.
Guides report a per-player cooldown of roughly 10 minutes, though sources differ.
Where is WARDOGS set?
Team17 describes the game as set in the derelict industrial mountains of Eastern Europe.
Fan hubs relay Bulkhead’s name for the fictional region, Kolchia.
Community sources place Ozeti in Western Europe and Zestafona in North America.