
Your Wardog level is the sum of your six class levels, Assault, Medic, Recon, Support, Driver and Pilot.
A content creator’s WARDOGS progression video shows this directly on the in-game level display, which is worth noting since other community write-ups have described the account-wide total as “Career” and treated the summation itself as unconfirmed community modeling rather than a published mechanic.
This guide covers the fastest confirmed method for each class on the current Season 1 Early Access build, plus a handful of combo routes that stack two or three classes into a single life.
A note before the numbers: BULKHEAD slowed the XP curve hard for the Early Access launch on September 10, 2026.
Any leveling clip or guide recorded during the earlier alpha or beta tests will look faster than what the live game pays out now.
Table of Contents
- Quick Answer: Level Every Class, Not Just One
- How WARDOGS Leveling Works
- How to Level Assault Fast
- How to Level Medic Fast
- How to Level Recon Fast
- How to Level Support Fast
- How to Level Driver Fast
- How to Level Pilot Fast
- Combo Strategies: Level Two or Three Classes at Once
- A Note on Post-Nerf Numbers
- Key Takeaways
- FAQ
Quick Answer: Level Every Class, Not Just One
WARDOGS never asks you to pick a class at spawn.
Whatever weapon, tool or vehicle you carry into a life decides which of the six tracks earns XP.
Your account-wide Wardog level is just those six numbers added together.
On the live Season 1 curve, taking all six classes to level 10 costs roughly 210,000 XP total, six classes multiplied by the official 35,000 XP that BULKHEAD’s own changelog lists for reaching level 10 on a single track.
The beta curve only needed 25,000 XP per class to reach level 10, for a total of 150,000 XP across all six, which is the figure still floating around in older guides and clips.
The official XP bands show the curve steepening sharply past level 10, so pushing one class deep costs far more than spreading across all six, though BULKHEAD has not published a single total figure for a full solo climb.
Spreading out also gets you moving gear faster: leveling six tracks to 10 nets an AK74, an SKS, an RPG-7, a hammer, a truck unlock and a helicopter unlock along the way, instead of one deep specialization.
That said, if you want a specific late-game unlock, hyperfocusing on that one track is still the only way to get there, and there is nothing wrong with doing that on purpose.
How WARDOGS Leveling Works
Every weapon, tool and vehicle in the vendor is tagged to exactly one class, and hovering its tile shows which one.
Assault rifles and pistols pay Assault.
Submachine guns pay Medic.
Marksman rifles, sniper rifles and the compound bow pay Recon.
Shotguns, LMGs and launchers pay Support.
Ground vehicles pay Driver and helicopters pay Pilot.
Actions matter as much as kills: healing and reviving pay Medic without a kill, a hammer swing on an unfinished structure pays Support, and marking a target through binoculars pays Recon.
BULKHEAD published the first official XP table alongside its Season 1 changelog on the Steam news hub on September 9, 2026, the night before Early Access launch.
Compared to the closed betas, it slowed progression noticeably: level 10 now needs 35,000 XP (up from 25,000), level 15 needs 110,000 (up from 54,750, roughly 101% slower), and level 20 needs 250,000 (up from 111,500, roughly 124% slower).
The curve flattens again from level 35 onward.
BULKHEAD has also said in its Steam FAQ post that each future season will use a different XP curve and item order, so treat the figures in this guide as a Season 1 snapshot rather than a permanent rule.
One more mechanic worth knowing before you spend anything: the Hot Zone, a shifting sub-area inside the larger Control Zone, pays double on both points and cash for anyone inside it.
A player inside the Hot Zone counts as two toward their team’s zone presence, so playing around it rather than away from it is worth doing for every class below.
How to Level Assault Fast
Assault is the class that levels itself.
Your faction’s free recruit rifle costs $0, and every kill or assist with it pays Assault XP.
Which specific rifle you start with depends on your faction: WARDOGS issues three different free starters, the Bushmaster M17S, the A-91 and the KH-2002, and all three share the same core stats and feed Assault XP identically.
The unlock ladder from there runs AK74 at Assault 3 for $10,000, Galil at 10 for $35,000, M4 at 20 for $100,000, and FAL at 35 for $200,000.
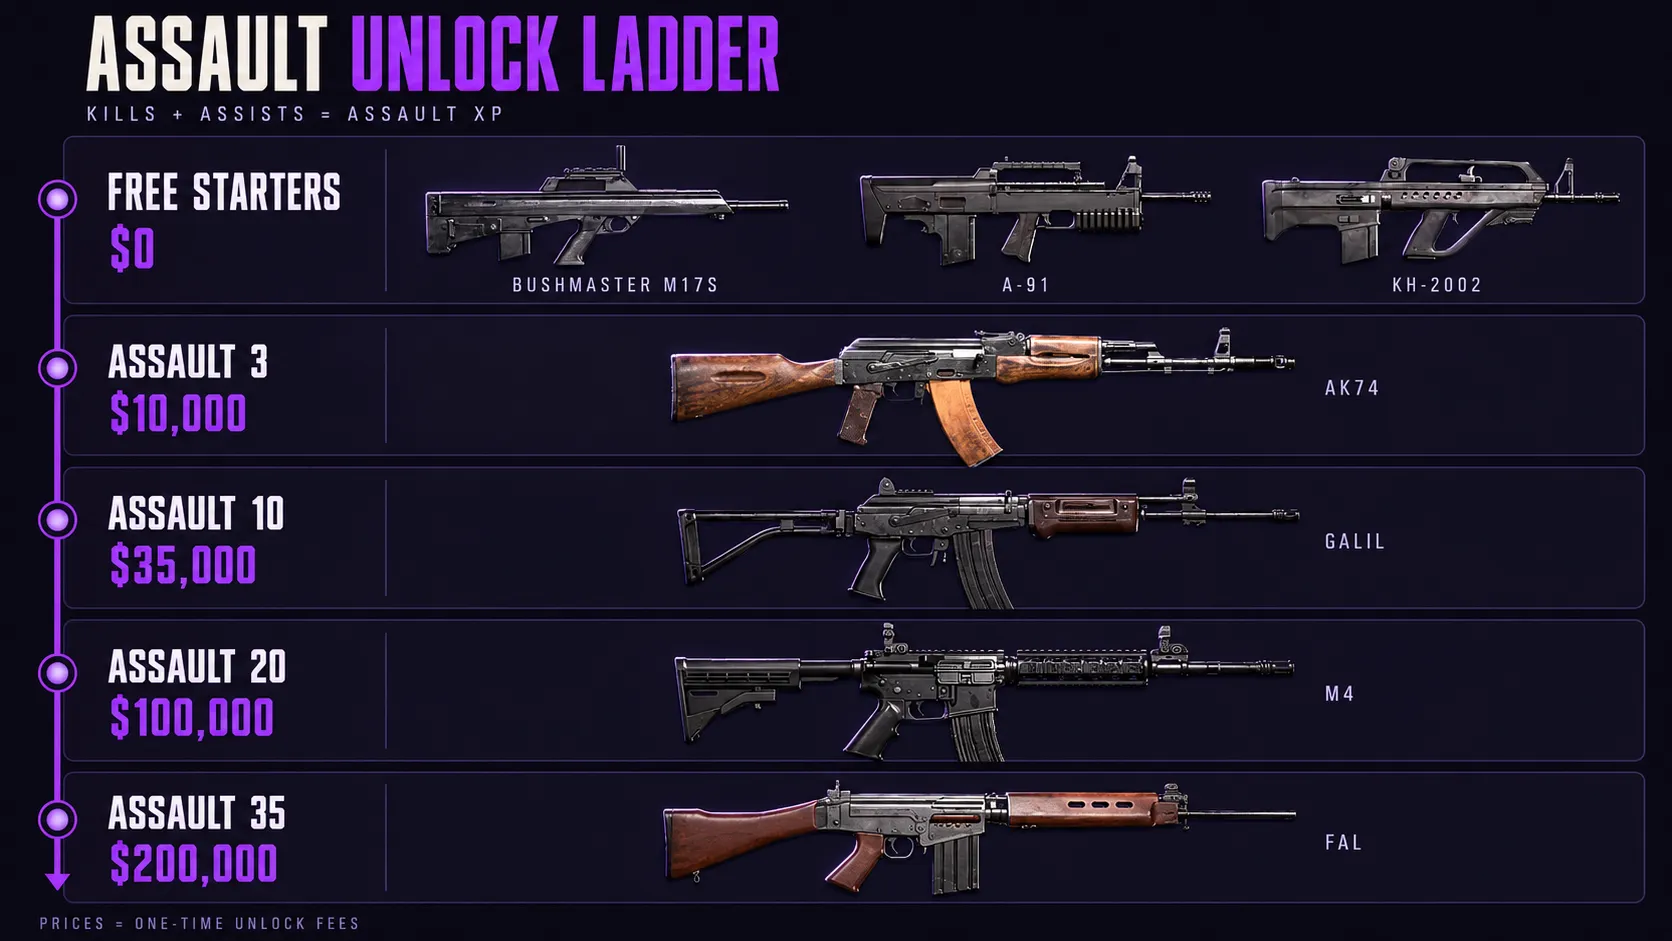
A content creator who tested the launch build recommended pushing to the AK74 as quickly as possible since it is full-auto and effective at medium range with a reduced-recoil attachment, though where it lands against other options is covered in the full weapons tier list.
There is no real shortcut here beyond staying in the fight: shoot people, prioritize the Hot Zone where the payout is doubled, and the class fills in on its own while you focus on something else.
Because the starter rifle is free, it is also worth carrying even when you are not trying to level Assault at all.
A driver or pilot who has to defend themselves picks up Assault XP purely as a side effect of using their free backup weapon.
How to Level Medic Fast
Medic pays out from SMG kills, healing teammates and reviving them.
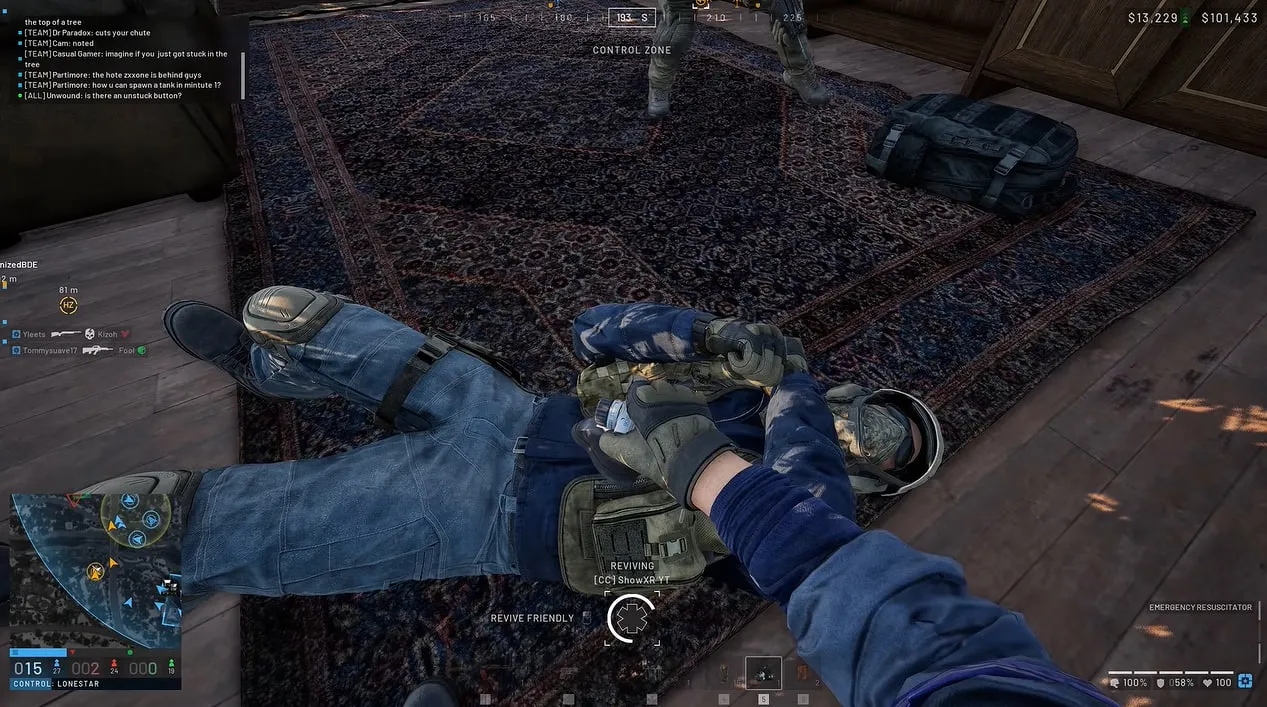
The single biggest mistake new players make is healing themselves: self-aid pays nothing, while healing a teammate restores both of you and pays Medic XP to only the healer.
The unlock ladder runs a Field Resuscitator at Medic 2 for $10,000, white smoke at 5, an Individual First Aid Kit at 9, a Defibrillator at Medic 11 for $50,000, and the MP5 at 15.
Reviving pays twice over, since a player you bring back keeps sending you Medic XP for their kills and assists afterward.
Carry more bandages and a spare resuscitator than you think you need.
A content creator who tested the Early Access build described stocking five to ten bandages and a free revive item, then spending all of it on teammates rather than yourself before restocking from a downed ally or an enemy body.
Once smoke grenades unlock, they are worth using far more than most players realize.
Throwing one over a downed teammate before reviving them turns an exposed revive into a safe one, and the same creator noted that most players simply do not bother.
How to Level Recon Fast
Recon’s starting sniper rifle is reportedly weak, described by the same creator as unable to reliably drop an unhelmeted player even with a headshot, so the early game is about spotting rather than shooting.
Binoculars cost $75, need no level at all, and pay Recon XP the moment you mark a player or vehicle, plus a second payout when anyone on any of the three factions kills what you marked.
From there the ladder runs SKS at Recon 5 for $25,000, Mosin Nagant at 10, SVD at 12, Compound Bow at 17, SV98 at 19, and Ghillie gear at 24.
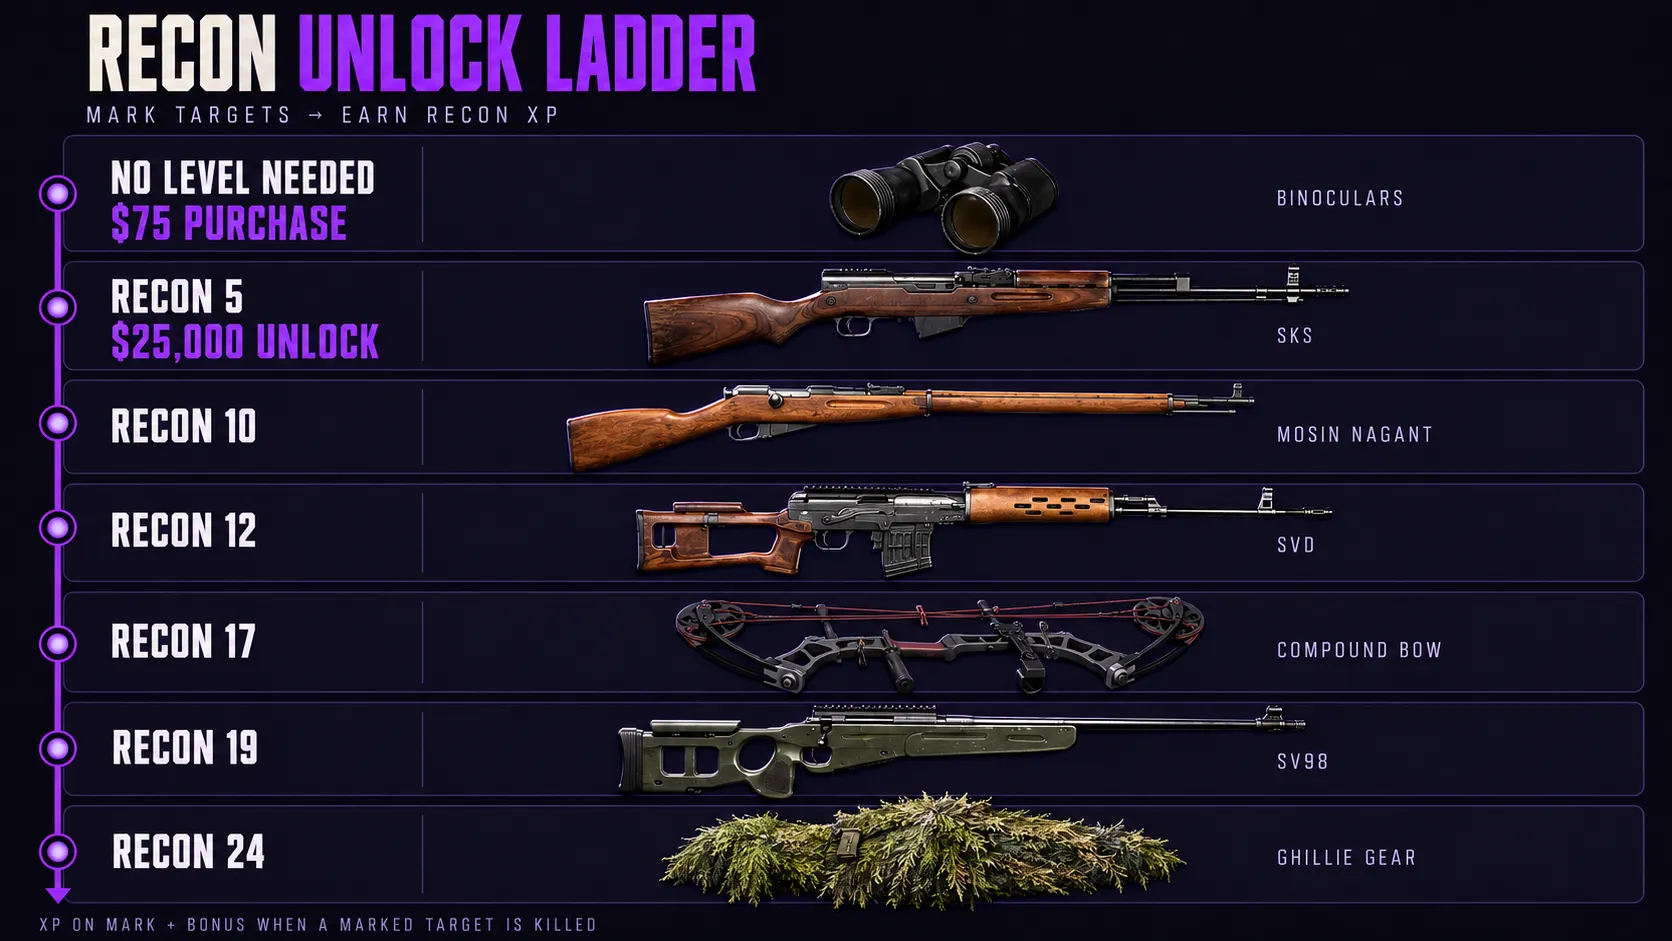
One content creator who tested the launch build argued you are better off carrying an assault rifle instead of the starting sniper until you have leveled into the SKS, since the starter weapon does too little to be worth firing.
Sniping also has a second job worth remembering once you have a real rifle: anti-air gunners and mortar crews reportedly sit exposed on their equipment far more than infantry ever do, so picking them off is both an easy Recon kill and a serious disruption to whichever team you are shooting at.
One habit worth building early comes from the same creator: a headshot kill reportedly does not reveal your position, while a body-shot kill does.
Plan to reposition after a body shot rather than staying put for a second target.
How to Level Support Fast
Support has more ways to earn XP than any other class, from shotgun and LMG kills to building, repairing, refueling and delivering supplies.
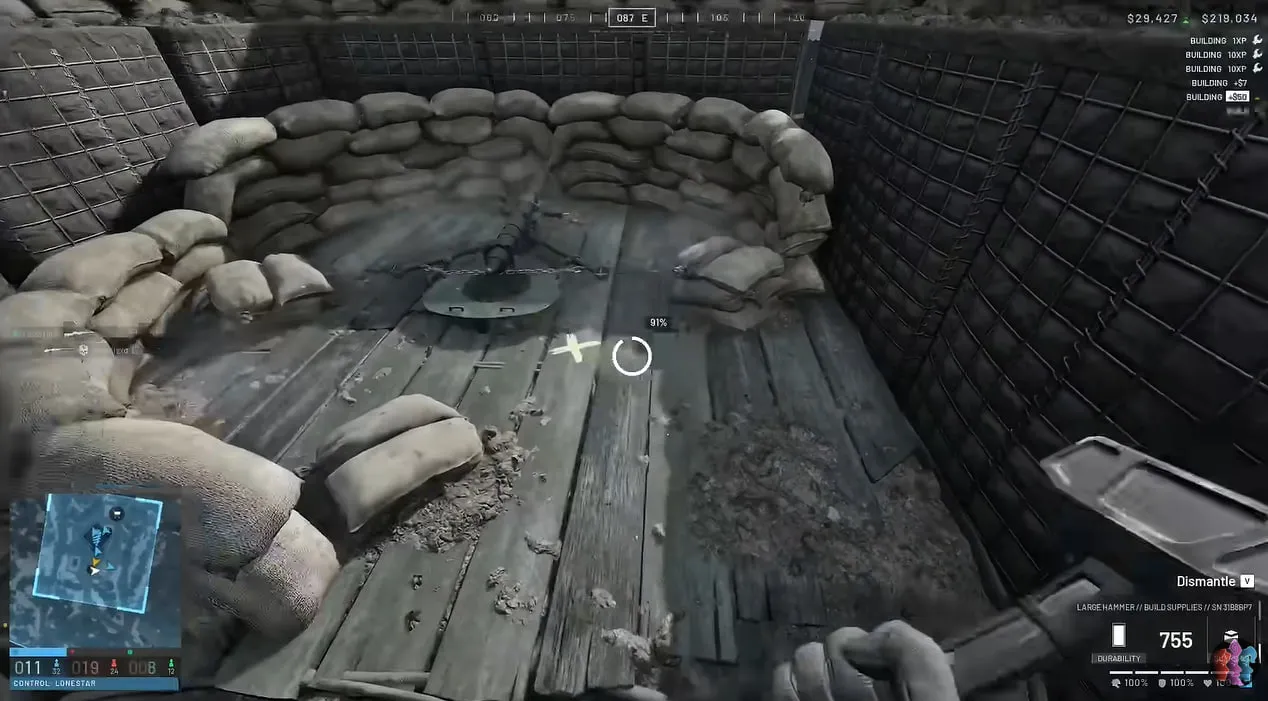
Building is consistently the fastest route because it pays on every hammer swing rather than requiring a kill.
A Forward Operating Base costs $7,500 and ships with a hammer for building.
The Large Hammer unlocks at Support 8 for a $75,000 payment, and completing a structure pays a bonus on top of the per-swing XP, all without the risk of losing your kit in a gunfight.
The RPG-7 unlocks at Support 5 for $30,000, and community reporting describes it as better suited to lighter vehicles than to heavy armor.
The MAAWS, unlocking at Support 20 for $125,000, is more commonly described as the reliable option against armored targets, though BULKHEAD has not itself published vehicle-specific effectiveness data for either launcher.
Once you have a hammer up and a base going, players have reported reaching Support 34 over a single beta weekend almost entirely from one match spent building.
That figure is unconfirmed beyond community reporting and reflects the beta curve, so it is a useful benchmark rather than a live-game promise given how much slower Season 1’s curve now runs.
How to Level Driver Fast
Nobody is getting into your truck if a helicopter is an option, so logistics runs are Driver’s real bread and butter rather than ferrying passengers.
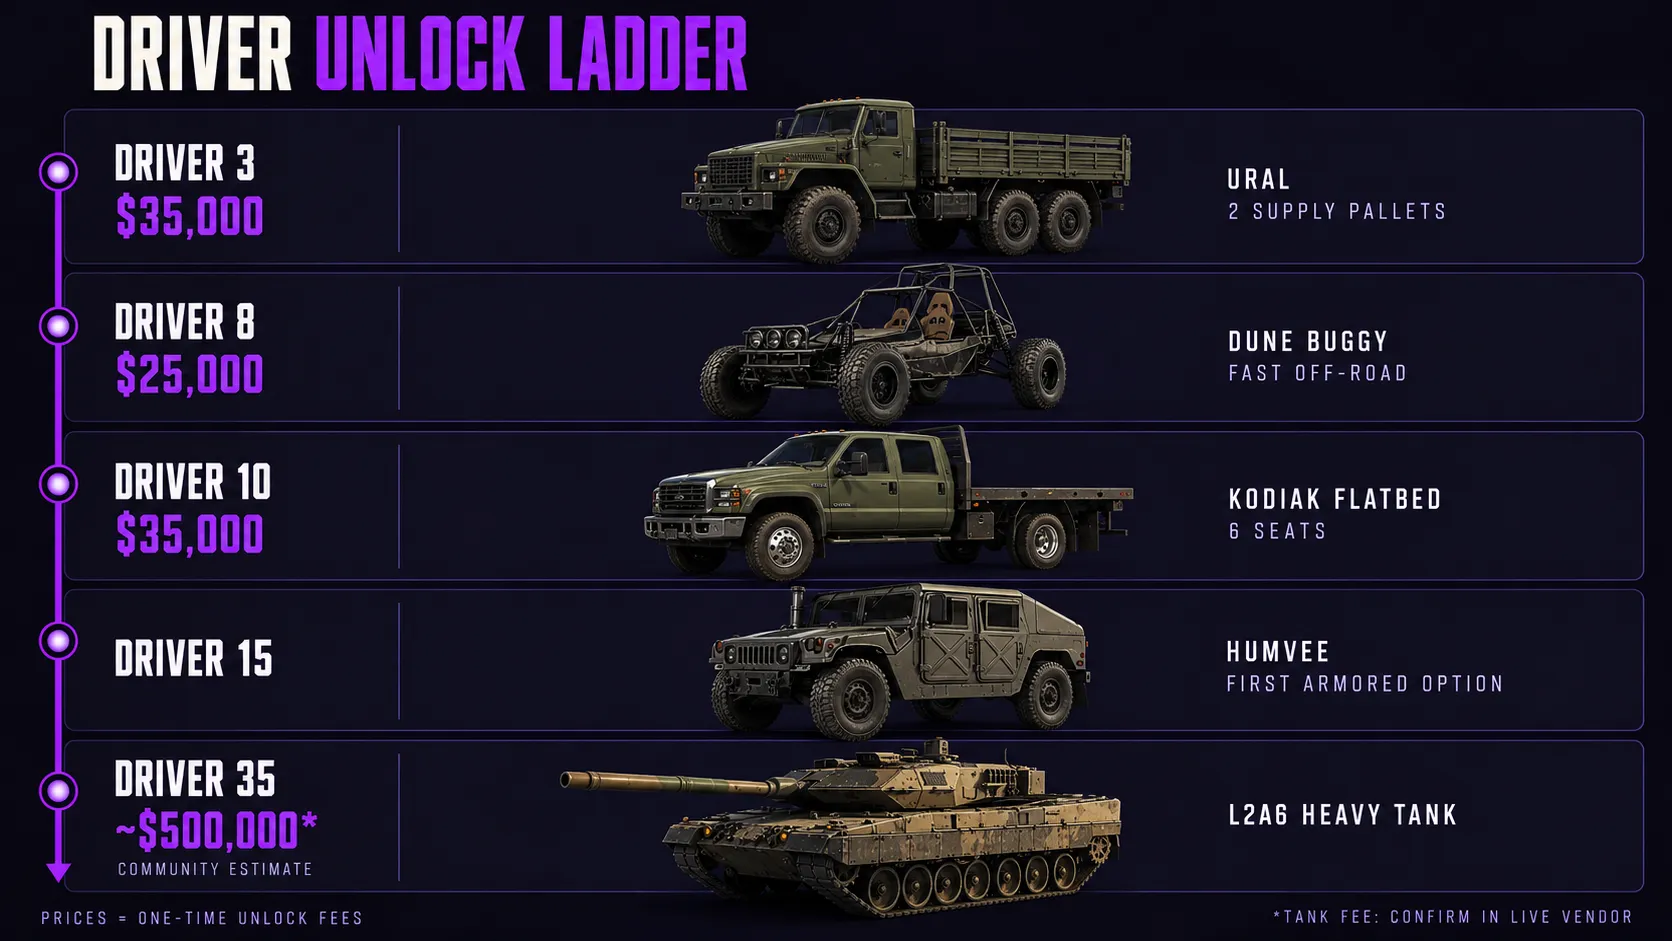
The URAL unlocks at Driver 3 for $35,000 and carries two supply pallets at once.
The Dune Buggy at 8 for $25,000 is the fast off-road option.
The Kodiak Flatbed at 10 for $35,000 carries six.
The Humvee at 15 is the first armored option.
The L2A6 heavy tank sits at Driver 35 per BULKHEAD’s own Season 1 changelog, which confirms the level move but does not itself publish an unlock price; community sources put that figure at roughly $500,000, and it is worth confirming in the live vendor rather than treating it as official.
A content creator testing the launch build recommended asking teammates directly what they need rather than guessing.
Check the map for which Forward Operating Base is low on a specific supply type, or simply ask in text or voice chat who is building and what they are short on, since a crate nobody buys from pays you nothing.
Do not skip the armored spawn vehicle either.
It appears once your team hits 20 Control Zone points, and a content creator testing the build described it as taking around five minutes to respawn if destroyed.
Every teammate who spawns on it while it survives pays you Driver XP and cash on a cooldown, which makes simply driving it into the Control Zone and leaving it there one of the more reliable Driver routes in the early game.
How to Level Pilot Fast
Pilot pays from flying passengers, crate deliveries, and air combat kills.
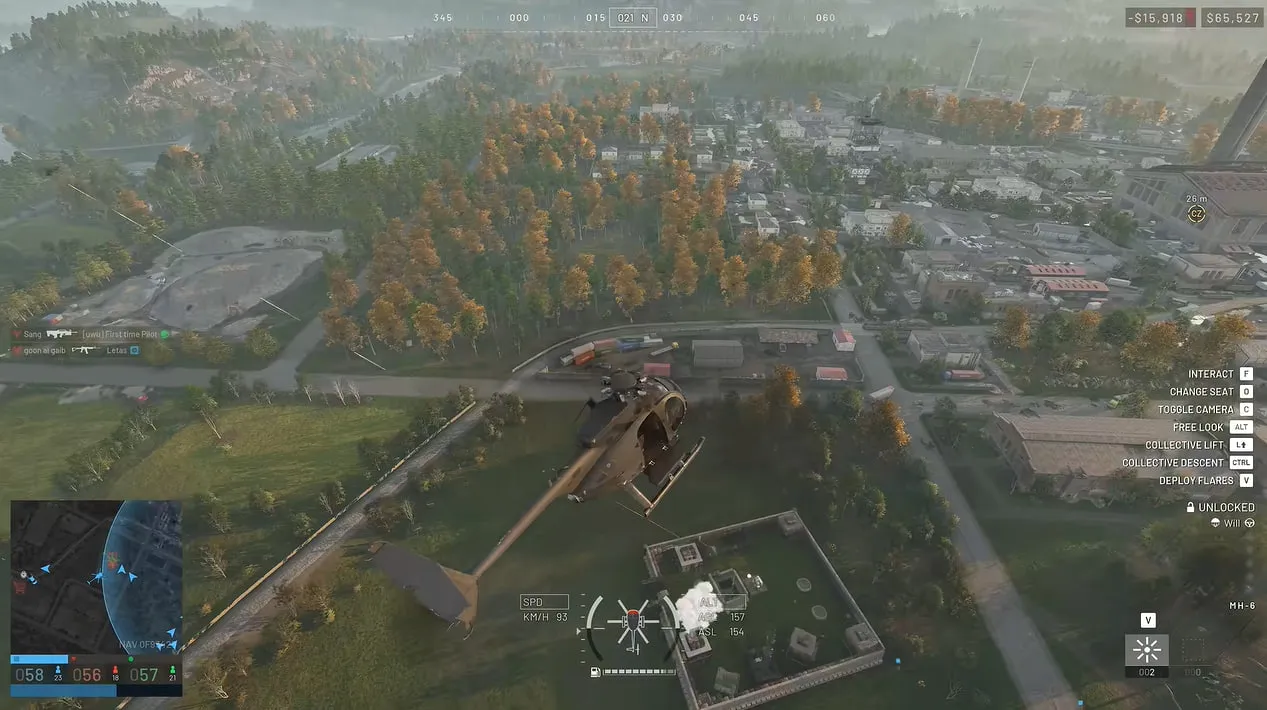
The MH-6, at $6,250 per spawn with no unlock cost and no level gate, is the aircraft that should level the track for you before you touch anything else.
The unlock ladder runs an armed Little Bird at Pilot 4 for $50,000 and the Z20 Lakota at Pilot 10 for $35,000.
An armed Little Bird with rockets unlocks at Pilot 20 for $250,000.
The Havoc attack helicopter is reported to sit at Pilot 35, though its price has not been confirmed by BULKHEAD directly and community figures around a $500,000 unlock should be checked against the live vendor.
Ferrying teammates into the Hot Zone is the simplest early route since the doubled payout there applies to Pilot the same way it applies to everyone else.
A content creator testing the Early Access build noted that with progression slowed at launch, fewer players are running around with rocket launchers and man-portable anti-air than during the fast betas, which leaves a longer early window where gunships can operate with less resistance.
Crashing costs money as well as time.
Beta testers reported a $1,500 penalty per player on board when a helicopter goes down, a figure that has not been separately confirmed on the live Early Access build, so practicing landings in the firing range before flying a full cabin into a real match is worth the ten minutes it takes regardless.
Combo Strategies: Level Two or Three Classes at Once
Because XP follows the item and the action rather than a class you picked at spawn, a single loadout can fill two or three bars in the same life.
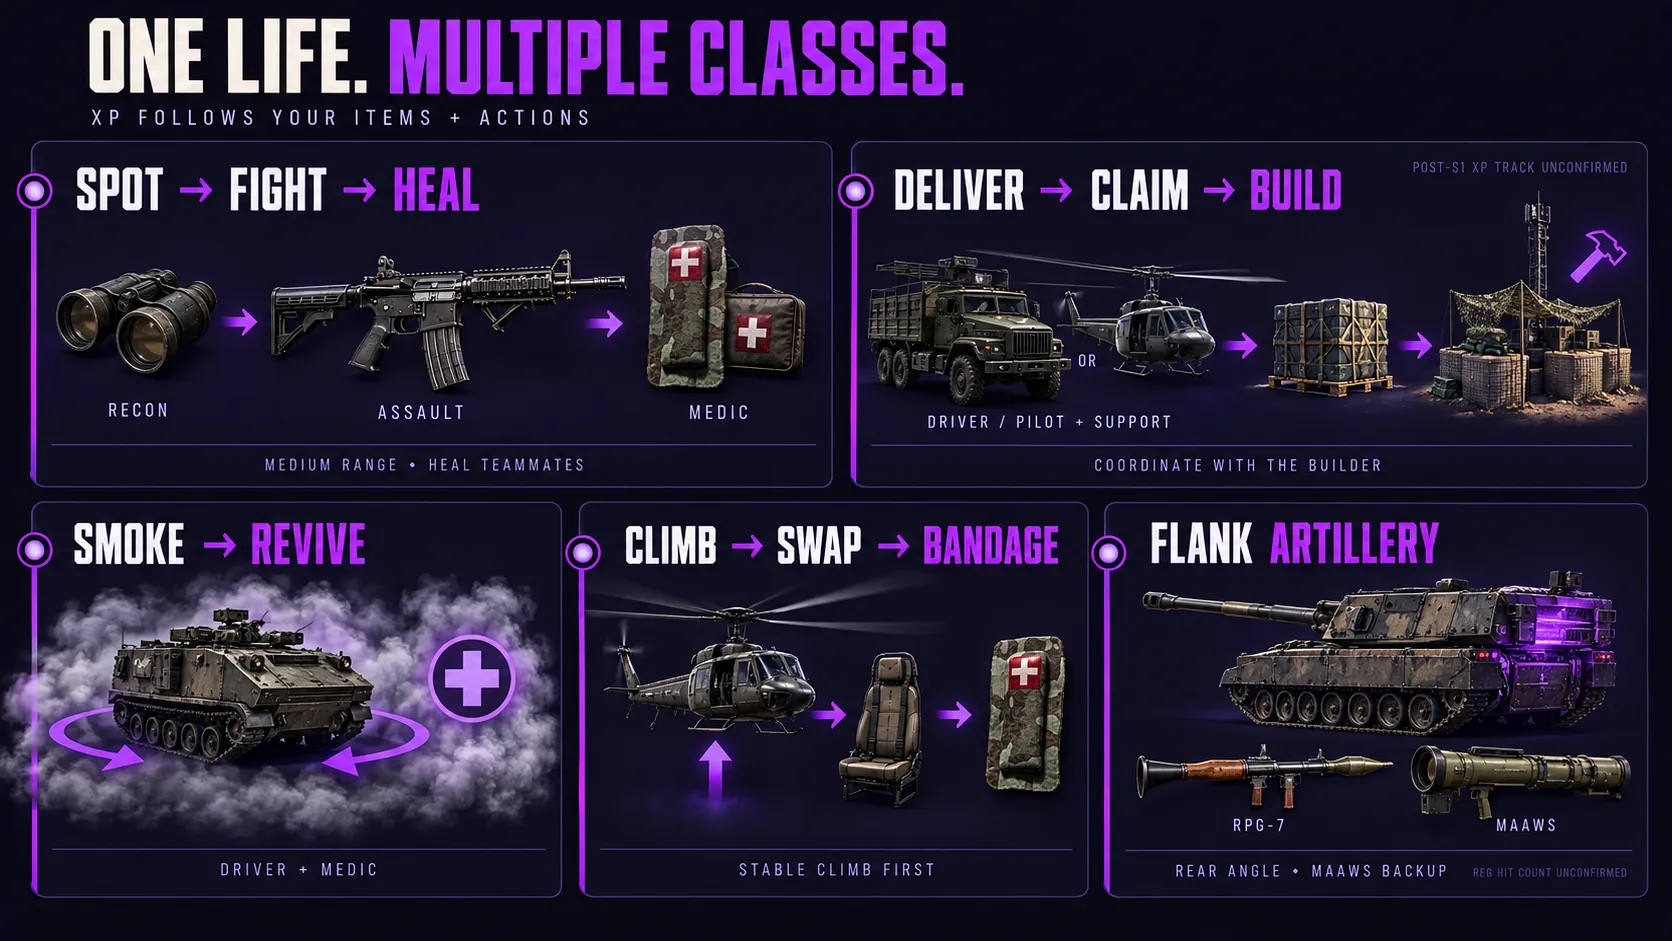
The assault-recon-medic loop. A content creator who tested the launch build described carrying an assault rifle for Assault XP, binoculars in a spare slot to spot targets before engaging them for Recon XP and assists, and an oversized stock of bandages and a spare revive item to spend purely on teammates for Medic XP, all in the same life.
Playing at a medium range rather than rushing close combat gives you the time to pull out the binoculars between engagements, which is the part players tend to skip.
The driver-pilot-support pallet loop. Once a Driver has the URAL or a Pilot has a helicopter that carries a supply pallet, dropping that pallet at a Forward Operating Base pays the delivery vehicle’s track.
A teammate claiming the pallet reportedly pays both the claimer and the deliverer money and XP at no cost to the person claiming it, though which specific track the delivery itself credits has not been separately confirmed since the Season 1 relaunch.
Coordinating directly with whoever is building, rather than dropping supplies blind, makes teammates far more likely to claim what you bring.
Asking in chat what a specific FOB needs, or buying and placing the supplies into the base yourself so a teammate’s kills with them credit you, are both described as reliable ways around a crate nobody touches.
The spawn-vehicle smoke-spin revive. Driving the team’s armored spawn vehicle up near the front line does more than farm Driver XP from teammates spawning on it.
One content creator described using the vehicle’s own smoke trail as mobile cover: park near a downed ally, then spin the vehicle in place so the smoke wraps around it in a full circle, creating a screen you can safely revive or heal behind before moving to the next position.
It is a Driver action that sets up a Medic action.
Bandaging from the passenger seat mid-flight. A Pilot running solo gunship missions does not have to land to patch themselves up.
Switching to a passenger seat while the helicopter is in the air lets you use a bandage on yourself, as long as you have first pointed the aircraft into a stable climb so it does not lose altitude while you are out of the pilot seat.
It is a small trick, but it keeps an expensive helicopter in the fight instead of forcing an early, exposed landing.
Sneaking RPGs onto artillery from a blind angle. Artillery crews spend most of a fight staring down their own gun camera.
A content creator who tested this in the Early Access build described walking up from an unwatched angle and firing an RPG-7 into the rear of a parked artillery vehicle for a fast kill, while warning explicitly against shooting the front, which is armored, a rule that holds across most of the vehicle roster.
Treat this one with a little more caution than the others.
The RPG-7 is more commonly described in community reporting as suited to lighter vehicles rather than the heavier armor class artillery falls under, and no vehicle health or hit-count figures for any launcher against any vehicle class have been published by BULKHEAD itself.
The flanking logic almost certainly still holds since an unarmored rear or engine deck is the general rule across every vehicle in the game, but whether three rounds from an RPG-7 specifically drops an artillery piece post-nerf is unconfirmed, so bring a MAAWS as your backup plan if the RPG does not finish the job.
A Note on Post-Nerf Numbers
Every specific XP figure and per-level unlock cost in this guide reflects the Season 1 Early Access build that launched on September 10, 2026, not the earlier alpha or beta tests.
BULKHEAD confirmed in its own Season 1 changelog that progression in those earlier tests was deliberately condensed so short weekend playtests could reach the whole game, and that beta progress does not carry over into Early Access at all.
If you come across an older guide, clip or forum post quoting faster leveling times or different unlock levels, it is very likely describing that earlier, faster curve rather than the game as it plays today.
BULKHEAD has said the XP curve and item order will change again with each future season.
Key Takeaways
- Your Wardog level is the sum of six class levels, so spreading across Assault, Medic, Recon, Support, Driver and Pilot levels your account faster than hyperfocusing on one.
- Season 1 slowed the XP curve hard at launch: level 20 now needs 250,000 XP, up from 111,500 in the beta.
- Support building is the fastest, lowest-risk XP in the game since it pays on every hammer swing without requiring a kill.
- Combo loadouts, an assault rifle plus binoculars plus medical gear, or a supply pallet plus a claiming teammate, can level two or three tracks in a single life.
- Numbers describing the earlier alpha and beta tests do not apply to the live Early Access build, and BULKHEAD has confirmed beta progress does not carry over.
FAQ
What determines your Wardog level in WARDOGS?
Your Wardog level is the sum of your six class levels, Assault, Medic, Recon, Support, Driver and Pilot. There is no separate Wardog XP bar. Raising any single class raises your overall Wardog level by the same amount.
Is it better to level one class or spread across all six?
Spreading across all six is faster for your overall Wardog level. Early levels on every track are far cheaper than late ones. Hyperfocusing still makes sense if you want one class’s late unlocks specifically, such as the Havoc helicopter or the L2A6 tank.
Why does leveling feel slower than it did in the beta?
BULKHEAD deliberately slowed the XP curve for the Season 1 Early Access launch. Levels 10 through 20 need roughly 40 to 124 percent more XP than the beta required. Guides and clips recorded before September 10, 2026 will show faster progress than the live game does now.
What is the fastest way to level Assault in WARDOGS?
Stay in the fight with your faction’s free starter rifle and push toward the AK74 at Assault 3. There is no real shortcut beyond kills and assists, so playing around the Hot Zone for its doubled payout is the only meaningful speed-up.
What is the fastest way to level Medic in WARDOGS?
Heal teammates rather than yourself, since self-aid pays no Medic XP at all. Carry more bandages and a spare resuscitator than you think you need, and spend them entirely on your team before restocking.
What is the fastest way to level Recon in WARDOGS?
Spot with binoculars before you ever fire the starting sniper rifle, since it is reported to struggle against armored targets even on a headshot. Binoculars cost $75, need no level, and pay Recon XP both when you mark a target and again when it dies.
What is the fastest way to level Support in WARDOGS?
Building is the fastest route. A Forward Operating Base pays Support XP on every hammer swing and a bonus when a structure completes, without requiring a kill or risking your kit in a gunfight.
What is the fastest way to level Pilot in WARDOGS?
Fly the MH-6, which has no unlock cost and no level gate, and ferry teammates into the Hot Zone for its doubled payout. It is the aircraft that should level the track before you touch anything else.
Can you level more than one class in a single life?
Yes. XP follows the item and the action rather than a class you selected. A loadout that mixes an assault rifle, binoculars and medical gear earns Assault, Recon and Medic XP in the same life.
Does the spawn vehicle help with leveling?
Driving your team’s armored spawn vehicle into the Control Zone pays Driver XP for the drive. Every teammate who spawns on it afterward keeps paying you while it survives, which makes it a reliable early Driver and cash source.
Is the RPG-7 confirmed to kill artillery tanks in WARDOGS?
Not officially. Community reporting describes the RPG-7 as suited to lighter vehicles rather than heavy armor, and BULKHEAD has not published vehicle-specific hit or damage figures for any launcher. Treat a rear-angle RPG kill on artillery as worth trying rather than guaranteed, and bring a MAAWS as backup.