Standing in a firefight with nowhere to resupply, no cover, and a tank rolling up the road is how most new WARDOGS squads lose their first few matches.
A Forward Operating Base fixes all three problems at once, but only if you know how to buy one, feed it the right supplies, and use what it unlocks. This guide walks through the entire process, including the one weapon a FOB gives you that can drop a tank in a single hit.
Table of Contents
- What a FOB Actually Does
- How to Buy Your First FOB
- What a Fresh FOB Starts With
- Hammer Tiers: What Each One Unlocks
- How to Deliver Supplies
- Placing and Defending Your FOB
- The Stingray Drone: One-Shotting Tanks
- Building the Drill: Pulling the Hot Zone
- Building a Talon Anti-Air Site
- Selling Supplies for Profit
- Common FOB Mistakes to Avoid
- Troubleshooting Your FOB
- Key Takeaways
- FAQ
Quick answer:
A WARDOGS FOB is a portable base you buy from a vendor, place on the ground, and load with supplies. It creates a build radius where your team can construct walls, mortars, anti-air, and specialist weapons using one of three hammer tiers. It is not, on its own, a spawn point.
What a FOB Actually Does
A Forward Operating Base is the anchor for everything your team builds away from spawn. Buy one, place it, and it marks out a radius where construction becomes possible and where stored resources are available to anyone building nearby.
It’s easy to assume a FOB works like a checkpoint you can respawn at. It doesn’t.
WARDOGS keeps base construction and spawn support as two separate systems. A FOB with no dedicated spawn vehicle nearby will leave your team walking back into the fight every time they die. Treat the FOB as your logistics and construction hub first, and figure out spawning separately. For the wider building system a FOB sits inside, see the WARDOGS base building guide.
How to Buy Your First FOB
The FOB isn’t available from the standard weapons vendor, which trips up a lot of new players who go looking for it in the wrong menu. Here’s the actual path:
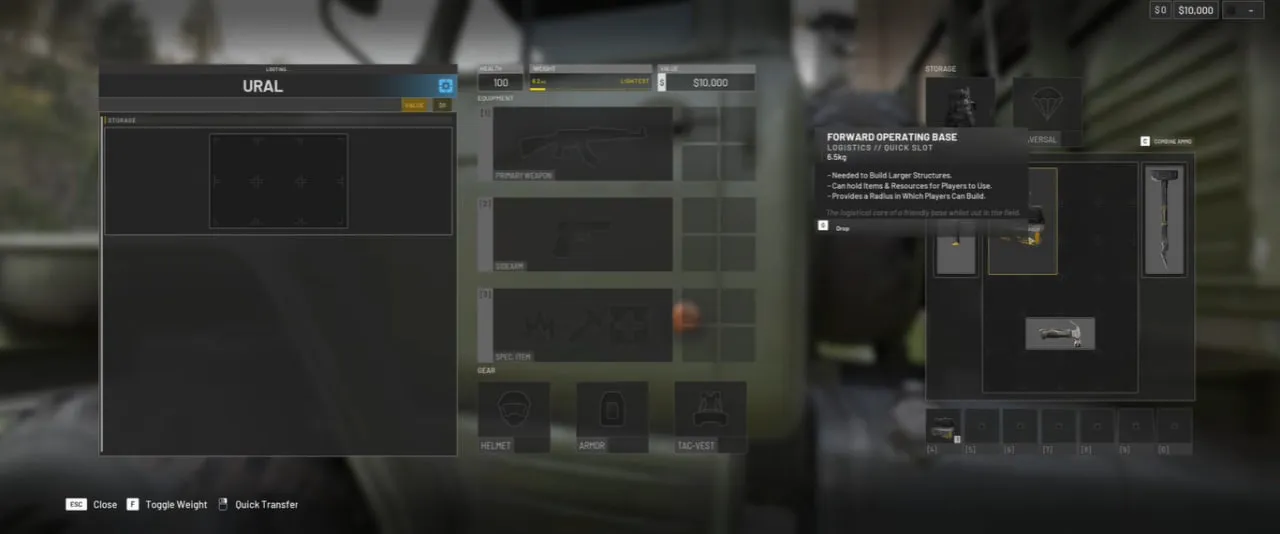
- Get into a vehicle with cargo space. An ATV won’t work. You need something that can carry pallets, like a Ural, which holds two. For which vehicles fit which job, see the WARDOGS loadouts guide.
- Open the buy menu with B.
- Go to Items, then Ammo and Logistics.
- Select the Building tab. The FOB is listed here, currently priced at $7,500 per life.
- Buy the FOB, then buy at least one building supply pallet from the Pallets option at the top of the same menu.
- Move the FOB into your backpack. It won’t fit in your specialist slot, so make sure you have the inventory space free before you buy.
- Pull it out and place it on the flattest ground available. Uneven terrain makes placement and later construction harder than it needs to be.
On the price: the FOB cost $2,500 in Closed Beta and jumped to $7,500 with the Season 1 Early Access launch on September 10, 2026, a change reported alongside similar hammer price increases in Season 1 coverage. In practice, that means one player eating the cost, or the squad agreeing to split it, matters more now than it did in beta. See the WARDOGS cash economy guide for how that balance carries between lives.
Once it’s down, opening the FOB’s inventory shows it already comes stocked with a small and medium hammer, plus a starting pool of resources covered in the next section.
What a Fresh FOB Starts With
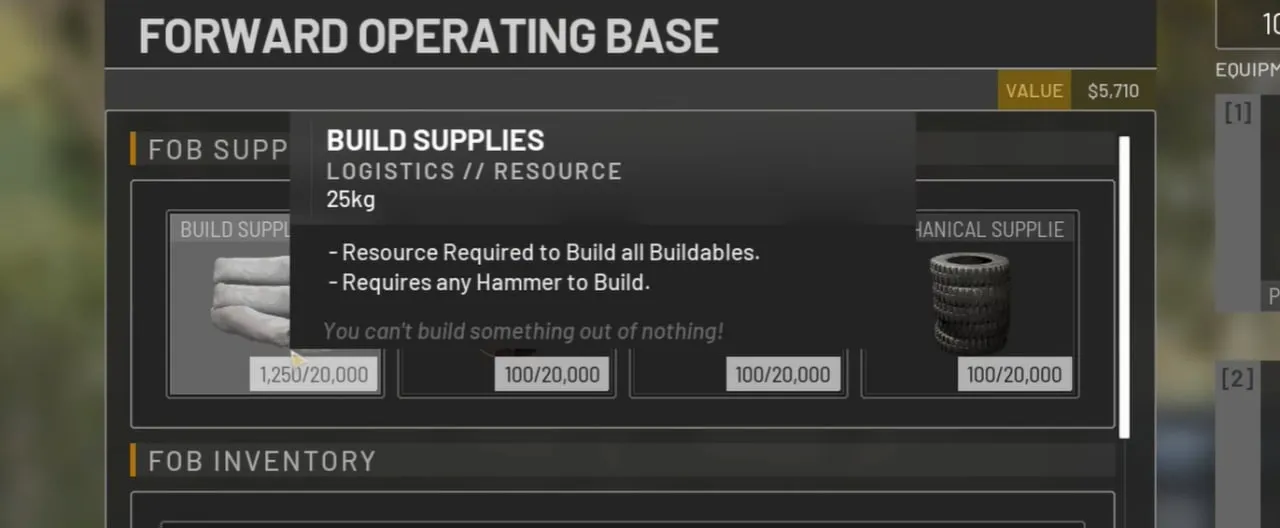
A newly placed FOB isn’t empty. Testing during Closed Beta consistently showed a starting pool of:
| Resource | Starting Amount |
|---|---|
| Building supplies | ~1,250 |
| Fuel | ~100 |
| Ammo | ~100 |
| Mechanical parts | ~100 |
That’s enough to get basic fortifications up immediately, but it runs out fast once you start on anything that needs a large hammer.
These starting figures come from Closed Beta testing. Season 1’s economy patch confirmed sweeping changes to FOB and hammer prices (covered below). But nothing in the official Season 1 or Patch 0.11 notes specifically revisits FOB starting-resource amounts, so treat this table as likely still accurate rather than officially reconfirmed.
Each of the four resource types feeds a different part of the base:
- Building supplies cover general construction: walls, hesco blocks, gates, and most structures across all three hammer tiers.
- Fuel powers vehicle-adjacent systems and the constructible Drill.
- Ammo feeds mortars and anti-air weapons once they’re built.
- Mechanical parts are specifically for the Stingray drone station, and this is the one new players most often get wrong. Instinct says a flying weapon needs ammo, but it draws from mechanical parts instead.
Hammer Tiers: What Each One Unlocks
WARDOGS gates construction behind three hammer tiers, and each one adds a full page of new buildables rather than just a few extra items.
| Hammer | Unlocks | Vendor cost (per life) | Support progression track cost |
|---|---|---|---|
| Small (starting) | Basic barriers, hedgehogs, barbed wire, sandbags. Notably, these can be built without a FOB nearby at all. | Free | n/a |
| Medium | Everything the small hammer builds, plus hesco walls, gates, doors, and the loudspeaker. These require a FOB’s build radius. | not stated in patch notes | $25,000 |
| Large | Adds heavier structures like reinforced walls on its second page, then branches into two further pages covering refuel stations, repair stations, the constructible Drill, the Talon anti-air launcher, mortars, the Stingray anti-tank drone, and a heat-seeking anti-air missile station. | $2,400 | $75,000 |
The practical takeaway: if you only ever carry the small and medium hammers, you will never see the Stingray, the Drill, or anti-air on your build menu.
The large hammer is what turns a FOB from a fortified camp into an actual weapons platform. It’s worth prioritizing over extra defensive walls once your team has one going.
Confirmed pricing update: WARDOGS tracks two separate costs per hammer tier. There’s a per-life vendor price you pay each time you spawn with it, and a Support-track cost tied to your account’s progression, one of the roles in the WARDOGS classes guide. Season 1 (live since September 10, 2026) raised both.
Per patch notes reported by Shacknews and independently corroborated elsewhere:
- The large hammer’s vendor cost went from $1,600 to $2,400 per life
- The large hammer’s Support-track cost went from $25,000 to $75,000
- The medium hammer’s Support-track cost went from $10,000 to $25,000
On the Support level requirement: some community coverage claims Season 1 also raised the large hammer’s level gate from Support 7 to Support 8. Shacknews’ direct read of the patch notes states no Support level requirement changed at all in Season 1.
The two accounts disagree, and Bulkhead’s own Steam post wasn’t directly checkable for this guide. Treat any specific level number for the large hammer as unconfirmed and check in-game rather than trust either claim.
One thing not covered in patch notes at all: whether a freshly placed FOB still comes stocked with usable small and medium hammers for free, the way it did in Closed Beta testing, independent of the Support-track costs above. Treat that as likely still true but unconfirmed post-launch.
How to Deliver Supplies
Getting resources from your base to a FOB is a manual process, and it’s worth knowing the controls before you’re doing it under fire.
- Load pallets into a cargo-capable vehicle from the buy menu, under the Pallets tab.
- Drive to your FOB and get within its build radius.
- Press G to drop the selected pallet. Press it twice if you’re carrying two, since it unloads one at a time.
- Walk to the dropped pallet and hold F to unload it into the FOB.
Each pallet delivers roughly 1,800 units of whichever resource it’s carrying. A full building-supply pallet on top of the FOB’s starting pool is usually enough for a solid defensive setup.
But anything involving the Drill or an anti-air launcher will eat through that fast, so plan a resource-specific run rather than grabbing whatever’s closest.
One detail worth flagging separately: carrying a full load of supplies on your body, rather than in a vehicle, appears to trigger a weight penalty that slows your movement. This hasn’t been independently confirmed outside of Closed Beta hands-on footage, so treat it as a strong likelihood rather than a guaranteed rule until Early Access confirms it.
If you need to move fast, keep supplies in the truck and make short trips on foot with only what the current structure needs.
Placing and Defending Your FOB
Where you put a FOB matters more than how you build it. A few principles hold up across most of what’s been tested so far:
- Close enough to matter, far enough to survive. A FOB on the edge of the active zone gets found and shelled quickly. Pulling back behind a ridge or treeline costs a little travel time but buys a lot of survivability.
- Don’t stack everything in one visible cluster. A FOB, a Drill, a mortar, and an anti-air launcher all sitting together is an easy target for a single coordinated attack. Spread high-value structures across the build radius where the terrain allows it.
- Protect the control panel. An enemy who reaches your FOB’s panel and holds the interact prompt long enough can take the entire base for their own team. Losing a FOB this way is avoidable with basic perimeter awareness, but it happens constantly to squads that assume distance from the front line means safety.
- Reassess as the fight moves. WARDOGS uses a shifting Hot Zone, so a well-placed FOB this match can be irrelevant next match. Don’t sink resources into defending a position that no longer supports the objective.
The Stingray Drone: One-Shotting Tanks
This is the part of base-building most new players skip entirely, and it’s the single best answer to “how do I deal with a tank that’s shredding my team.”
The Stingray is a one-way, remote-piloted anti-vehicle drone built at a FOB using a large hammer. It draws from mechanical parts rather than ammo.
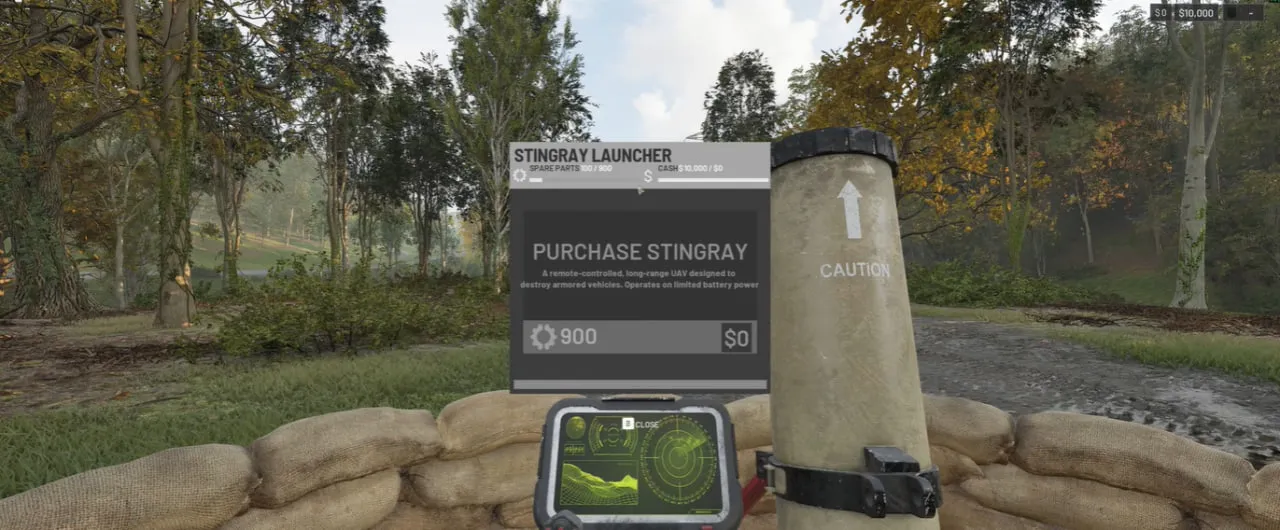
Getting one flying takes a bit of practice:
- With a large hammer equipped and enough mechanical parts in the FOB, build and purchase the Stingray station.
- Launch it. It needs a moment to gain altitude before you can steer it, so don’t expect immediate control.
- Guide it toward the target using the icon and lock-on indicator. A red lock means you’re lined up on the vehicle.
- Boost only once you’re close and locked on. Boosting burns battery fast, and a dead battery means the drone won’t detonate even on impact.
- Hit the target dead-on. Confirmed one-hit kills include tanks and artillery trucks in testing, the same targets covered in the WARDOGS vehicle destruction guide.
The battery mechanic is the part most players get wrong on their first attempt. A Stingray with no charge left will simply bounce off its target instead of exploding, which after a five-minute build process is an expensive way to learn the lesson.
Save your boost for the final approach, not the initial climb.
For squads without a dedicated drone pilot, this is also a two-or-three-person job in practice: someone hauling mechanical parts keeps the FOB stocked, someone builds, and the pilot flies. Splitting the work speeds up construction noticeably compared to one person hitting the build prompts alone.
Building the Drill: Pulling the Hot Zone
WARDOGS actually has two different systems that get lumped together as “the Drill,” and mixing them up wastes a supply run.
Fixed Towers already exist on the map, 3 to 5 per match. Each one holds a piece of a code. Collect the full code across towers and enter it at a tower’s Drill to pull the Hot Zone toward that tower. No FOB required. The full code mechanic is covered in the WARDOGS towers guide.
The constructible Drill is different. It’s a structure you build at your own FOB with a large hammer, and it lets your team pull the Hot Zone toward a location of your choosing instead of being stuck with the fixed towers.
This is the one that actually needs planning around resources. Pulling the Hot Zone is central to how a match is won, as covered in the WARDOGS King of the Hill mode guide.
Beta testing on the constructible Drill found:
- It needs a full Supply pallet plus a full Fuel pallet to comfortably cover both its build cost and activation
- It requires at least 1,200 Fuel banked before it will activate at all
- Once running, it burns through roughly 220 seconds of runtime per 1,800 Fuel delivered
- It must be placed inside the Combat Zone. Unlike a normal FOB, which can go almost anywhere, the Drill only works within that active battle area, so pick its legal, defensible spot before you commit a truck full of Fuel to it
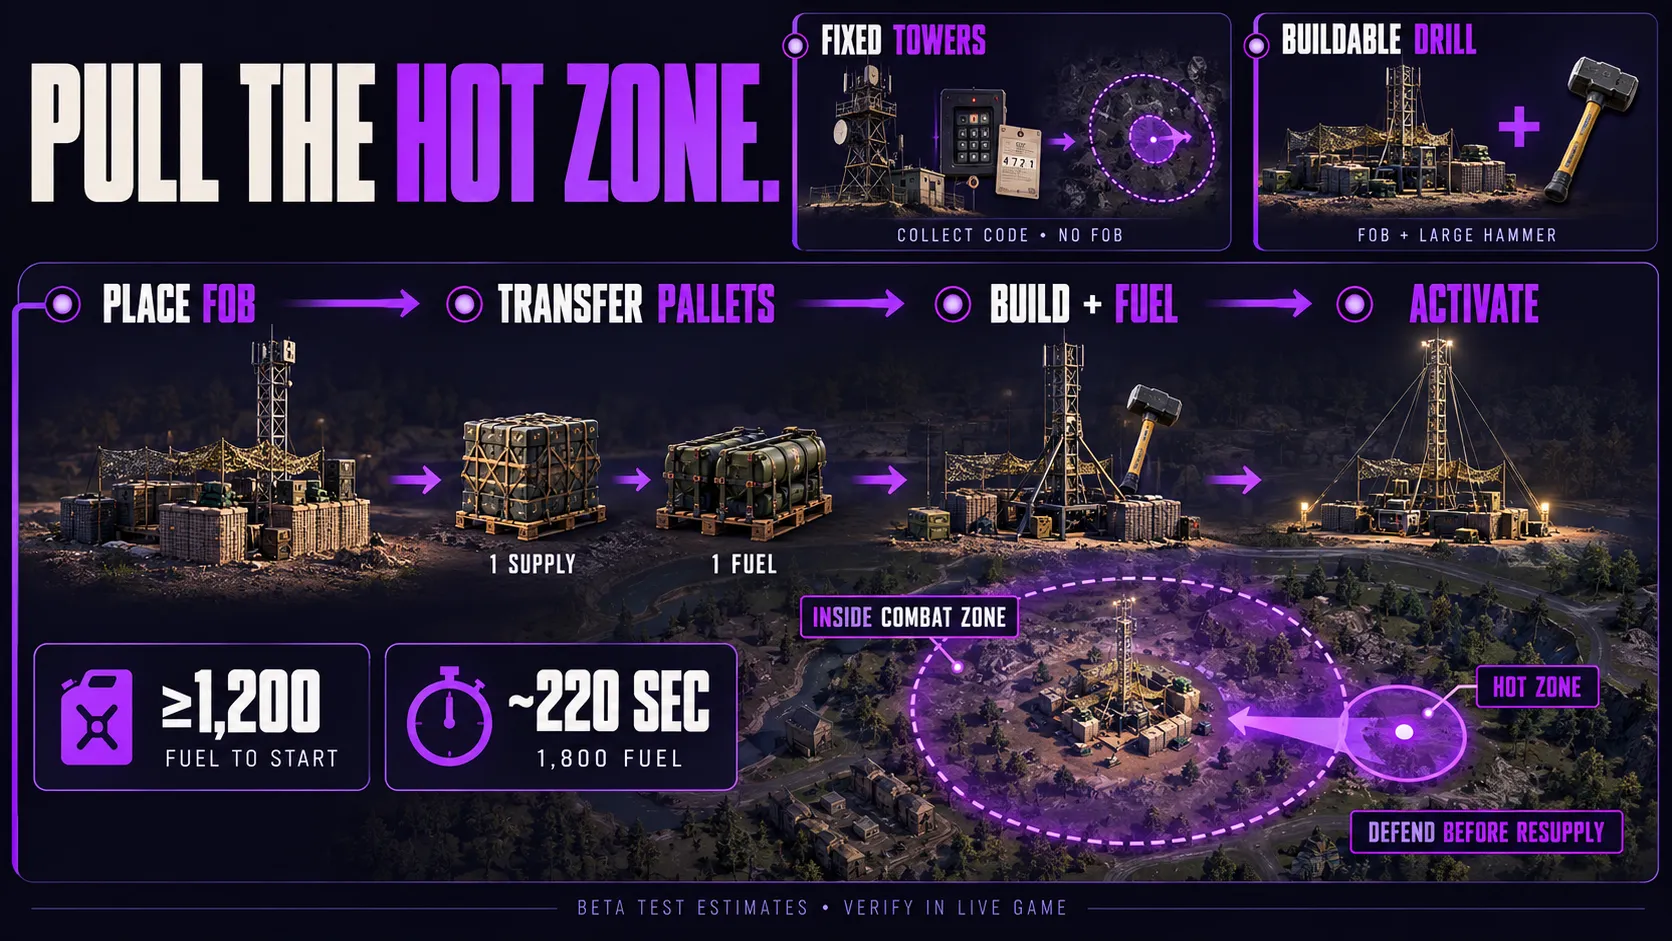
The build order that worked in testing: FOB + large hammer + 1 Supply pallet + 1 Fuel pallet. Deploy the FOB, confirm the radius, unload both pallets, transfer the resources, place the Drill, fuel it, and activate.
Then watch what happens before sending a second Fuel run. A Drill that’s already collapsing under enemy pressure doesn’t get better because you fed it more fuel.
This section is sourced from independent beta-era testing, not our own hands-on numbers or the transcript this guide is otherwise built from. Treat the specific figures as a planning baseline rather than a confirmed Season 1 rule, since neither the Season 1 changelog nor Patch 0.11 notes mention the Drill specifically.
Building a Talon Anti-Air Site
The Talon 9K-SAM is the large hammer’s anti-air answer, and it flips the usual resource math on its head: Supply isn’t the bottleneck, Ammo is.
Beta testing put the Talon’s build cost at roughly 801 Supply, which a fresh FOB’s starting pool (around 1,250 Supply, per the table above) comfortably covers on its own.
That frees up your truck’s two pallet slots for something else entirely: 2 Ammo pallets, rather than the Supply-and-Fuel split a Drill needs.
The math works out like this, using the same 1,800-per-pallet figure covered earlier:
- Starting Ammo: ~100
- Plus 2 Ammo pallets: + 3,600
- Total available: ~3,700 Ammo
- At roughly 50 Ammo consumed per missile: around 74 missiles before you need another resupply run
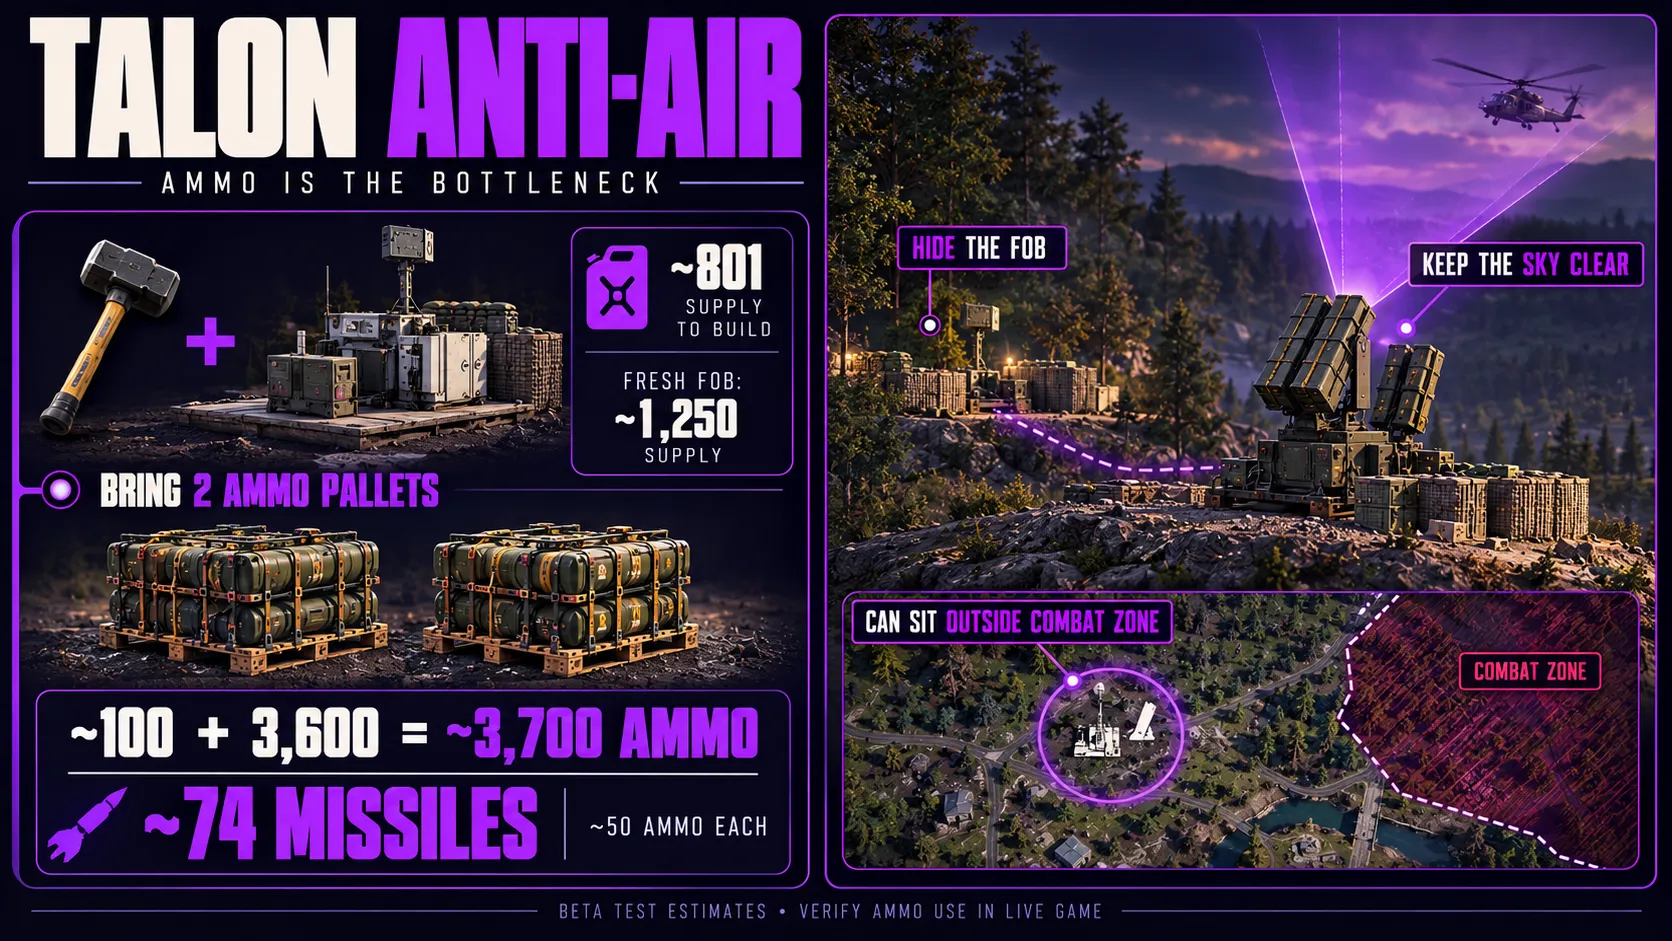
Placement works differently than a Drill too. The Talon doesn’t need to sit inside the Combat Zone. It needs a clear shot at wherever helicopters are actually flying, which is usually a predictable corridor between an enemy base and the active fight rather than the fight itself.
The trick is giving the site two things that don’t have to be in the same spot: a concealed FOB core hidden by terrain, and a launcher with an unobstructed firing arc. Don’t wall off the Talon’s sky-facing side to protect it; that defeats the point of building it.
Like the Drill figures above, these Talon numbers come from independent beta-era testing rather than confirmed Season 1 data, and patch notes don’t mention the Talon specifically. Verify the ammo-per-missile rate in your own matches before treating 74 missiles as a hard number.
Selling Supplies for Profit
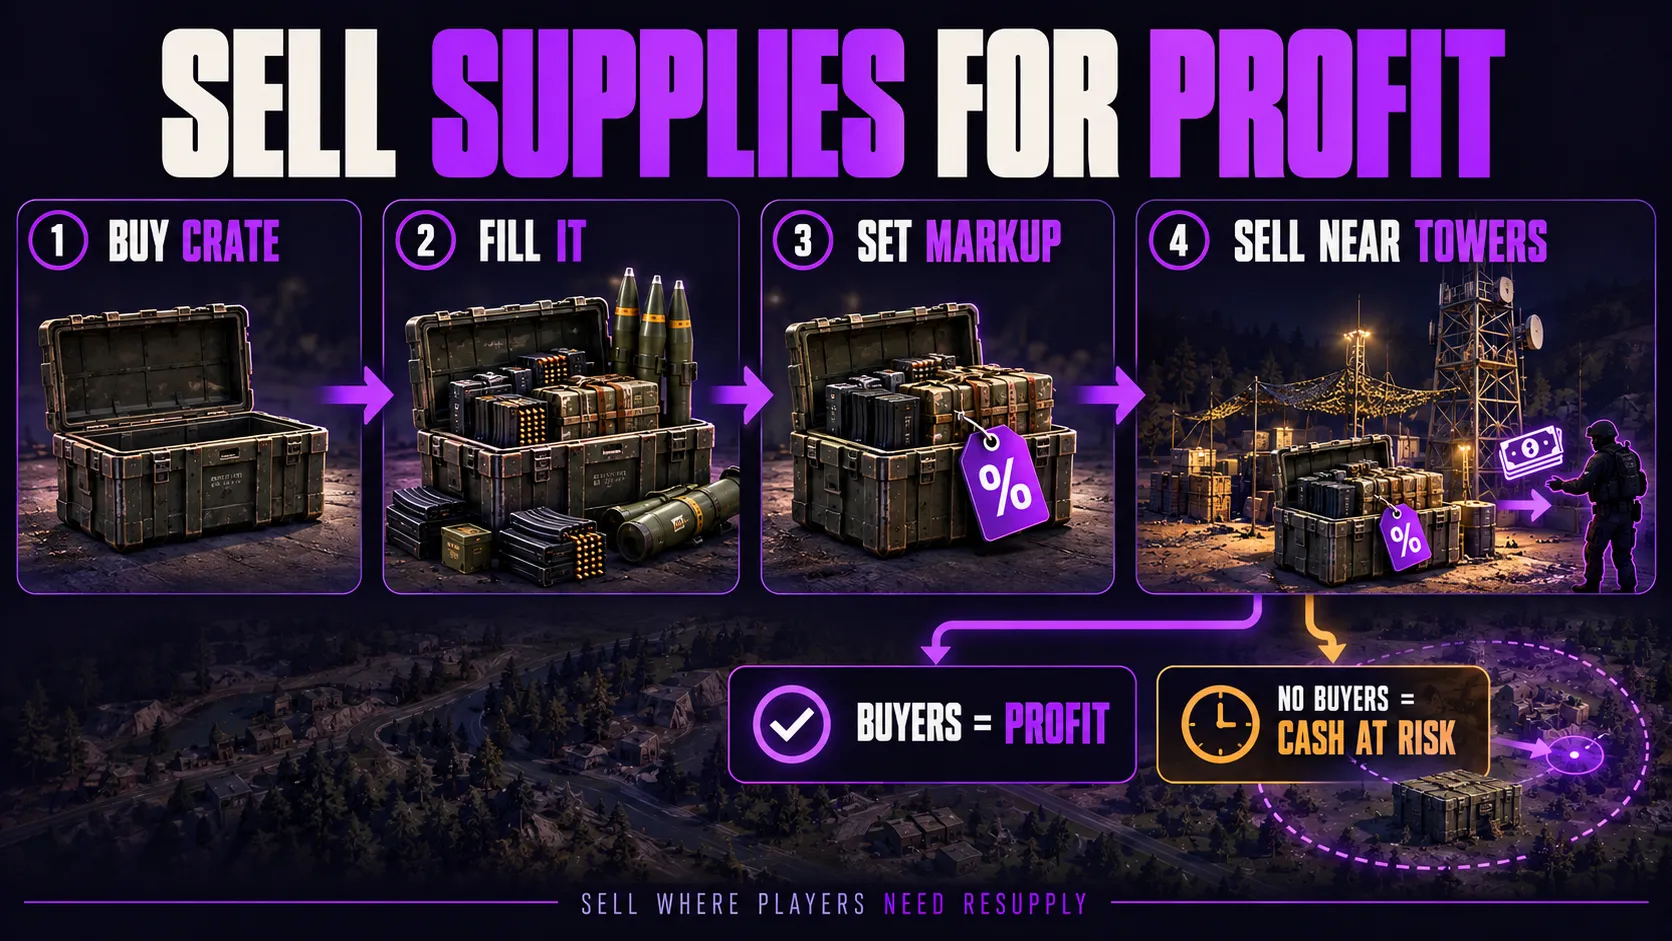
FOB logistics aren’t only for your own team’s defense. WARDOGS also lets you buy a crate, fill it with items, and sell it at a markup near towers for other players to purchase.
Buying rockets or ammo cheap and reselling them at a set percentage markup turns spare supply runs into cash. The risk is real: if nobody buys the crate before the fight moves on, that investment is gone.
This kind of player-driven resupply economy isn’t something you need for a basic FOB, but it’s worth knowing exists if your team has a dedicated logistics player looking for ways to fund the next big purchase.
Common FOB Mistakes to Avoid
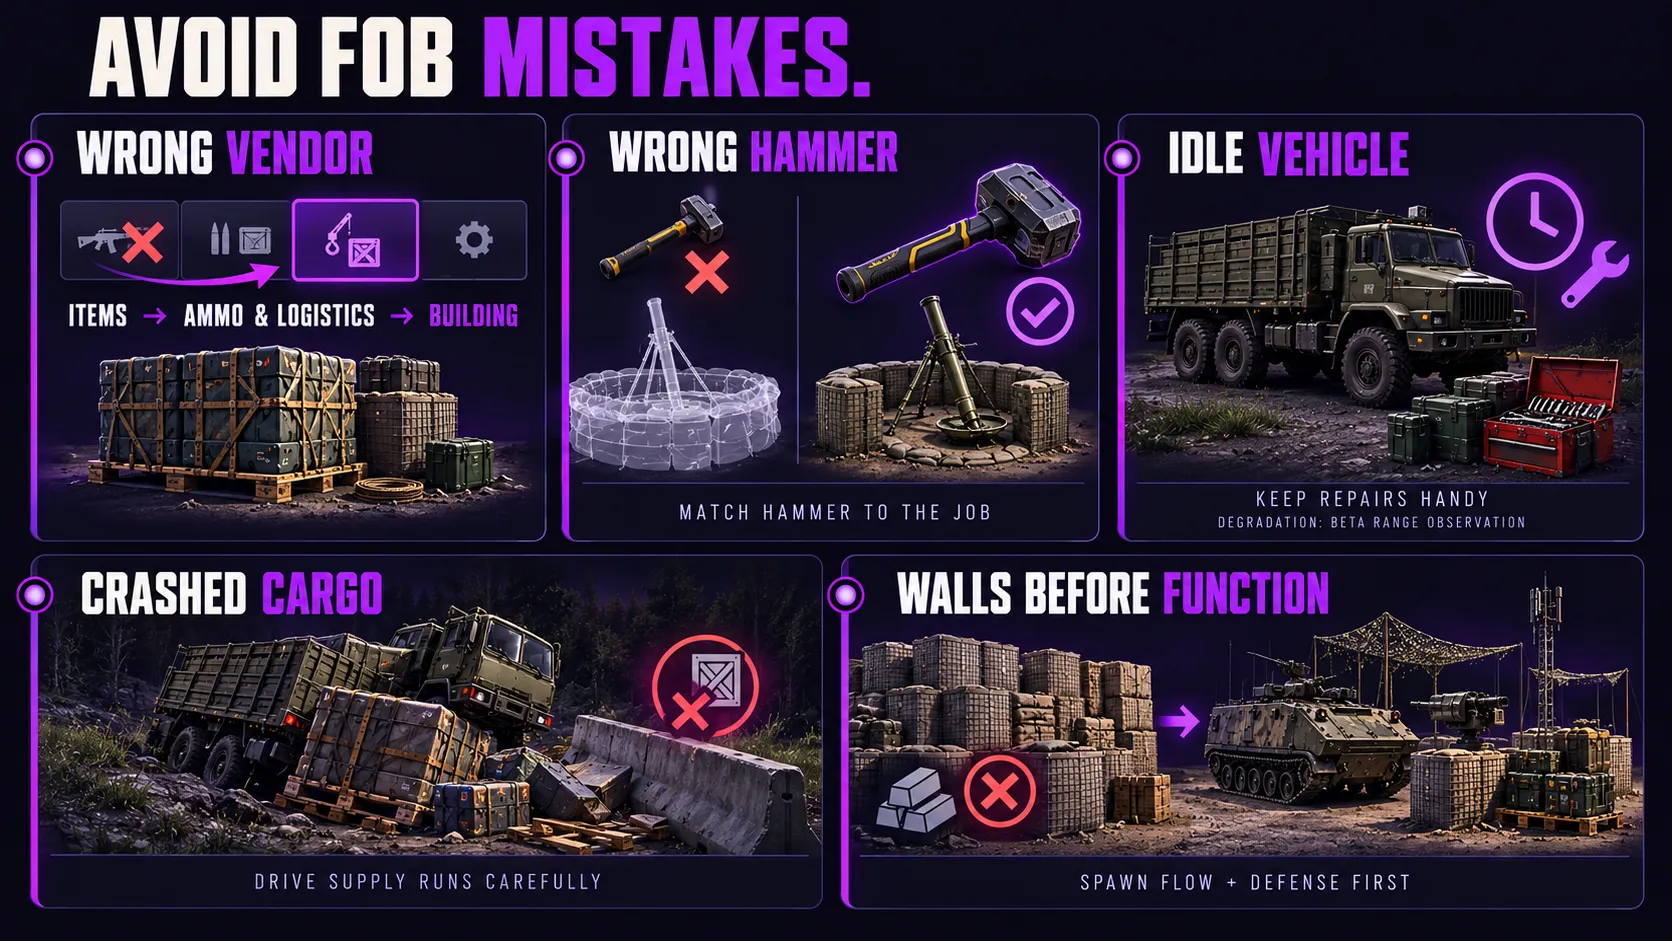
- Trying to buy a FOB from the wrong vendor tab. It’s under Items > Ammo and Logistics > Building, not the general equipment menu.
- Bringing the wrong hammer. Show up with only a small hammer and you’ll be stuck building barbed wire while your team needs a mortar.
- Leaving a vehicle empty for too long. Vehicles observed sitting unused for extended periods in Closed Beta testing began to degrade and eventually explode. This was seen specifically in the firing range test environment, so it’s not confirmed to behave identically in a live match, but carrying a wrench for repairs is cheap insurance either way.
- Crashing while hauling pallets. A hard enough impact can destroy the supplies you’re carrying, wasting the entire trip. Drive supply runs a little more carefully than you would an empty vehicle.
- Building everything at once. Spending your full resource pool on decorative walls before your team has a working spawn flow and a way to fight back leaves you with an expensive base and nothing to show for it.
Troubleshooting Your FOB
Mistakes are things you can plan around in advance. These are the problems that show up mid-match, and what to check first.
I placed the FOB but can’t build the structure I want.
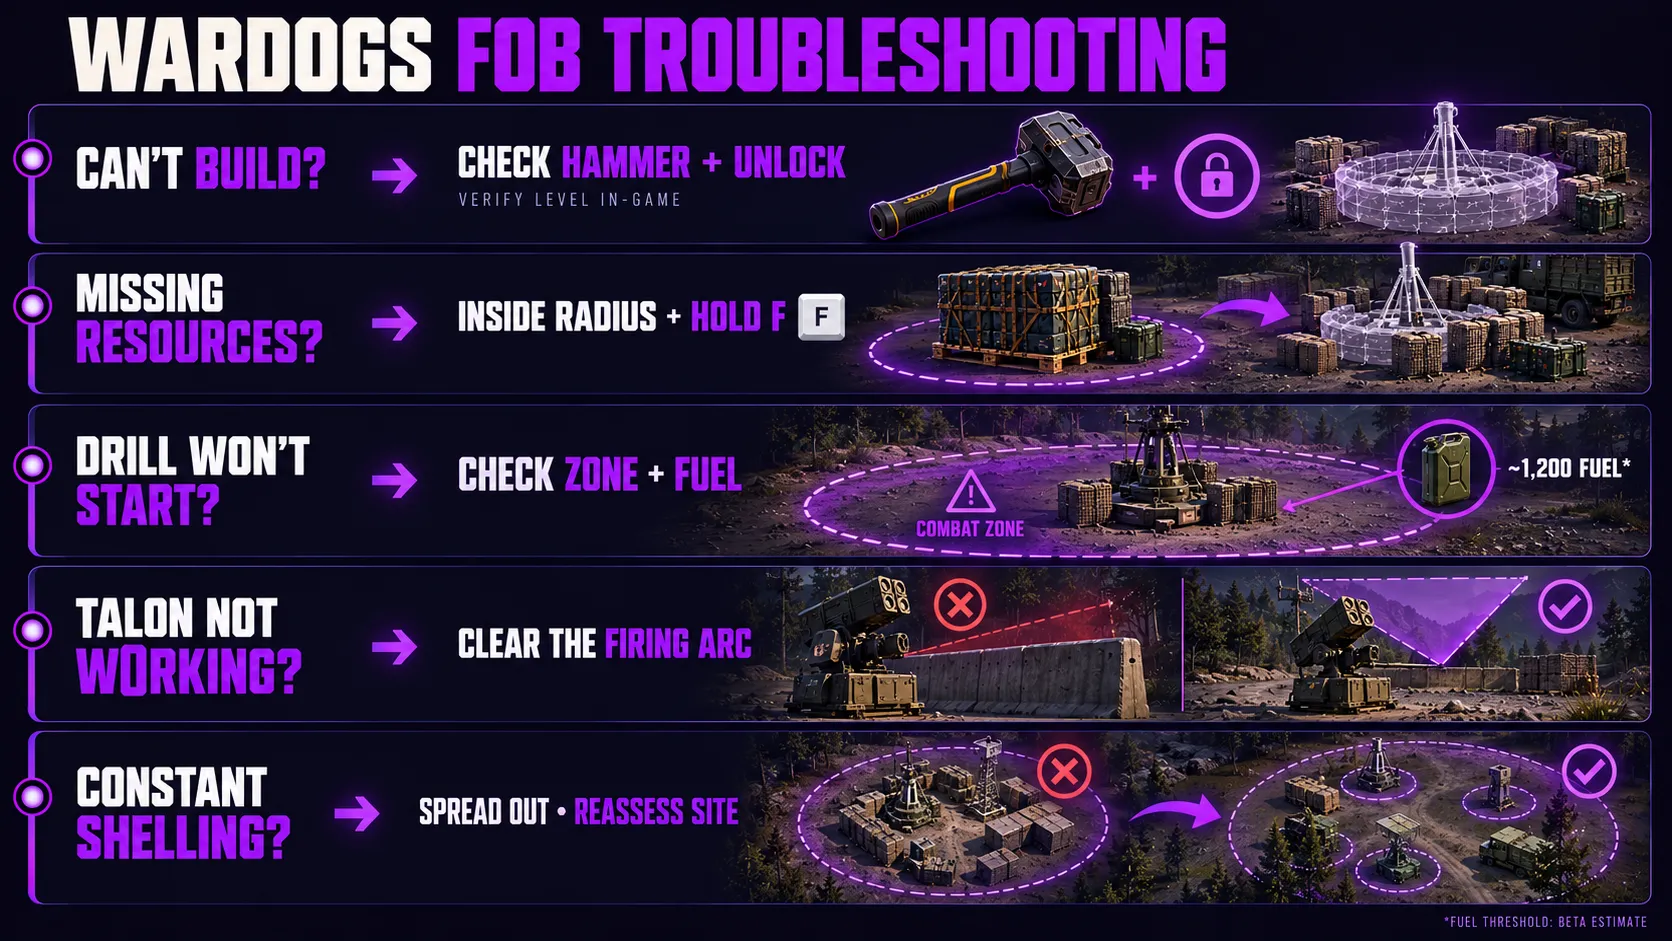
Check your hammer tier and the structure’s progression requirement before assuming something’s broken. A valid FOB doesn’t help if the hammer you’re holding, or your account’s progression level, doesn’t unlock that specific structure yet.
Whether the large hammer’s Support level gate changed in Season 1 is disputed between sources, so verify the current requirement in-game rather than assuming a specific number.
My pallet is next to the FOB but the resources aren’t showing up.
Being near the FOB isn’t the same as being inside it. The pallet has to land within the build radius, and someone still has to walk up and hold F to transfer it into the FOB’s inventory.
A pallet sitting untransferred beside the base is invisible to the hammer menu.
The Drill won’t activate.
Confirm it’s actually inside the Combat Zone; that’s a hard requirement unique to the Drill. Then check the Fuel total against the roughly 1,200 threshold covered above.
The Talon has plenty of Ammo but isn’t getting kills.
This is almost always a placement problem, not a supply one. Check the firing arc for obstructions before sending another Ammo pallet; more ammunition doesn’t fix a launcher that can’t see the sky.
My FOB keeps getting shelled.
More walls usually isn’t the answer to indirect fire. Spread high-value structures across the build radius instead of stacking them, and be honest about whether the position is still worth defending or worth abandoning.
Key Takeaways
- A FOB is a construction and logistics hub, not a spawn point. Spawning uses a separate vehicle.
- Buy a FOB through Items > Ammo and Logistics > Building, from any vehicle that carries cargo. It costs $7,500 per life as of Season 1, up from $2,500 in Closed Beta.
- A fresh FOB starts with roughly 1,250 building supplies and 100 each of fuel, ammo, and mechanical parts. These pool figures are Closed Beta observations not directly contradicted by patch notes, but not officially reconfirmed either.
- The large hammer is required for anti-air, mortars, the Drill, and the Stingray drone. It now costs $2,400 per life from the vendor and $75,000 on the Support progression track (both confirmed Season 1 increases); reports of a Support level-gate change are disputed between sources.
- The constructible Drill must be placed inside the Combat Zone and needs roughly 1,200 Fuel banked to activate. The Talon anti-air site is Ammo-limited, not Supply-limited, since a fresh FOB’s starting Supply typically covers its build cost.
- The Stingray drone can one-shot tanks and artillery but needs battery charge saved for the final approach to actually detonate on impact.
- Protect your FOB’s control panel. Enemies who hold the interact prompt long enough can take the whole base.
FAQ
What is a FOB in WARDOGS?
A Forward Operating Base, or FOB, is a purchasable structure that creates a build radius where your team can construct fortifications, resupply, and set up specialist weapons like mortars and anti-air.
It’s the core of WARDOGS’ logistics and base-building system.
Can you spawn on a WARDOGS FOB?
Not directly. The FOB itself is a construction and supply hub, not a spawn point.
Spawning support comes from a separate vehicle that has to be deployed and protected on its own, so don’t assume your team can respawn the moment a FOB goes up.
How do you buy a FOB in WARDOGS?
Get into a vehicle with cargo space, open the buy menu with B, go to Items under Ammo and Logistics, then select Building and purchase the FOB.
You’ll need a backpack slot free, since it won’t fit in your specialist slot.
What hammer do you need to build a FOB in WARDOGS?
A FOB comes with a small and medium hammer by default. The large hammer costs $2,400 per life from the vendor and $75,000 through the Support progression track.
It’s required for the heaviest structures: anti-air, mortars, the Drill, and the Stingray drone station. (Some sources also claim a Support level-gate increase from 7 to 8, but that specific detail is disputed and not repeated here as fact.)
How much does a FOB cost in WARDOGS?
As of Season 1, live since Early Access launch on September 10, 2026, a Forward Operating Base costs $7,500 per life. That’s up from $2,500 in Closed Beta.
It still takes up a 3x2 backpack slot.
What supplies does a FOB need?
Four resource types: building supplies for construction, fuel for vehicles and the Drill, ammo for mortars and anti-air, and mechanical parts for the Stingray drone.
A fresh FOB starts with roughly 1,250 building supplies and 100 of each of the other three.
How do you destroy a tank in WARDOGS?
The most reliable early-game method is the Stingray, a one-way anti-vehicle drone built at a FOB with a large hammer.
It requires mechanical parts to construct, has to stay locked onto its target through impact, and destroys tanks and artillery trucks in a single hit.
Why did my truck explode next to my FOB?
Vehicles left empty for extended periods can degrade and eventually explode.
This was observed in Closed Beta’s firing range specifically, so it may not carry over identically to live matches, but it’s safer to assume any parked vehicle needs occasional attention or a wrench repair.
Can other players steal my FOB?
Yes. An enemy who reaches your FOB’s control panel and holds the interact key long enough can take ownership of everything you’ve built there.
A FOB with no one defending it is a FOB you should expect to lose.
Does crashing a vehicle destroy the supplies inside it?
Yes, a hard enough impact can destroy the cargo you’re hauling. The exact damage threshold hasn’t been confirmed.
Driving supply runs carefully is worth the extra minute it costs.
How do you activate the Drill in WARDOGS?
Build the constructible Drill at a FOB with a large hammer, then feed it Fuel until it clears a roughly 1,200-Fuel activation threshold observed in testing.
It must be placed inside the Combat Zone, unlike a regular FOB, which can go almost anywhere.
How much Ammo does the Talon anti-air launcher use in WARDOGS?
Beta testing put it at roughly 50 Ammo per missile.
A fresh FOB’s starting Supply usually covers the Talon’s build cost outright, so a supply run for one is typically two Ammo pallets rather than a Supply-and-Fuel mix.