
A Humvee just rolled through your squad and your RPG hit did almost nothing.
The core rule in WARDOGS: where you hit, and what you hit with, matter more than how many rockets you carry. A $300 IED in the right spot kills a tank. A $2,000 launcher aimed at a tire can leave a quad bike driving.
Here’s how to destroy vehicles in WARDOGS with every infantry explosive, based on one creator’s range tests and the game’s damage data.
Table of Contents
- Quick Answer: Explosives vs Every Vehicle
- The Five Anti-Vehicle Explosives
- Why the Numbers Look Like This: Damage Modifiers
- Four Rules That Apply to Every Vehicle
- Bobcat and Dune Buggy
- Kodiak, Kodiak Pickup and Kodiak M249
- Humvee
- URAL, URAL Defender and URAL Defender M249
- SPH-2 Artillery Tank
- L2A6 Tank
- What Destroying Vehicles Pays
- Tactics: Getting Close Enough to Use Them
- AT Mines, Drones and What Wasn’t Tested
- Which Explosive to Carry
- Common Mistakes
- Will This Change in Season 2?
- Key Takeaways
- FAQ
- Sources
Quick Answer: Explosives vs Every Vehicle
The numbers below are explosives needed from full health at the best spot, from the creator’s range testing.
Treat them as starting points, not guarantees. Explosive damage in WARDOGS is placement-sensitive, and the creator saw the same shot kill a vehicle in one test and leave it smoking in the next.
| Vehicle | Frag | C4 | IED | RPG-7 | MAAWS |
|---|---|---|---|---|---|
| Bobcat | 1 | 1 | 1 | 1 | 1 |
| Dune Buggy | 2 | 1 | 1 | 1 | 1 |
| Kodiak (all variants) | 3 | 1 | 1 | 1 | 1 |
| Humvee | 4 | 2 | 1 | 2 | 1 |
| Humvee M249 / Minigun | 5 | 2 | 1 | 3 | 1 |
| URAL | ~5 | 2 | 1 | 1 | 1 |
| URAL Defender | 3-5 | 2 | 1 | 1-2 | 1 |
| URAL Defender M249 | 4-5 | 2 (rear axle) | 1 (rear axle) | ~2 | 1-2 |
| SPH-2 Artillery Tank | No kill | 2 | 1 (burns out) | 3 | 2 |
| L2A6 Tank | No kill | 4 | 1 (burns out) | 3 | 2 |
The short version: hit the engine, never the tires or glass, and bring an IED if you can get close.
The Five Anti-Vehicle Explosives
WARDOGS gives infantry five tools for killing ground vehicles. Four of them sit early in the Support role track, which matters because the creator notes XP comes fastest below level 9.
| Explosive | Cost per life | Unlock | Best use |
|---|---|---|---|
| M67 Frag Grenade | $200 | Early | Light vehicles, last resort |
| C4 Charge | $250 + $550 detonator | Support 5 at the latest | Stacking on parked or slow targets |
| IED | $300 | None | Cheapest one-shot on most vehicles |
| RPG-7 | $2,000 | Support 5 ($30,000 unlock) | Ranged kills on light and medium vehicles |
| MAAWS | $2,600 | Support 20 ($125,000 unlock) | Everything, especially tanks |
Prices and unlocks are Season 1 figures. BULKHEAD reshuffled unlock levels in the Season 1 changelog, so check the vendor before you plan around them. Some players report C4 unlocking as early as Support 2.
The two launchers work differently under the hood:
- RPG-7: fires a 93mm rocket at 110 damage per round, with a 300 m effective range. Its in-game description only claims effectiveness against infantry and light armored vehicles. The RPG-7 launcher guide breaks down its unlock path and handling in more detail.
- MAAWS: fires an 84mm anti-tank shell at 100 damage per round. The shell costs $200 and has a 25 m minimum arming distance, so it won’t detonate on a target closer than that.
The MAAWS does less raw damage per round than the RPG-7. It wins because of how vehicles resist each round, which the next section breaks down.
Why the Numbers Look Like This: Damage Modifiers
Every vehicle in WARDOGS has a hidden resistance or weakness to each damage type. Dexerto’s WARDOGS wiki lists these modifiers on its individual vehicle pages for the Humvee, URAL, SPH-2 and L2A6, and they explain almost every result in the creator’s testing.
A negative number means the vehicle resists that explosive. A positive number means it takes bonus damage.
| Explosive | Humvee | URAL | SPH-2 | L2A6 |
|---|---|---|---|---|
| Frag grenade (inner radius) | -35% | -15% | -60% | -60% |
| C4 | -20% | -55% | -25% | -25% |
| IED | +150% | +50% | +10% | +30% |
| RPG-7 (93mm rocket) | -70% | -30% | +17.5% | +17.5% |
| MAAWS (84mm shell) | +30% | +30% | +140% | +140% |
| AT mine | +200% | +250% | +145% | +145% |
| Drone (Stingray) | +350% | +500% | +500% | +450% |
Three things jump out.
The IED is a Humvee killer. It gets +150% against the Humvee while C4 gets -20%. That’s why one IED anywhere kills a Humvee, but C4 needs two charges in the right spot.
The RPG-7 is the wrong tool for Humvees. A 70% resistance to its 93mm rocket explains why the creator couldn’t find a single one-shot spot on any Humvee.
The MAAWS is built for armor. Its +140% bonus against both tanks is why two MAAWS shells do what three RPG rockets do.
The data also lists a large bonus (+200% on the Humvee and URAL) for rockets that detonate inside the inner blast radius. That lines up with the creator’s finding that a clean body hit kills while a glancing tire or roof hit doesn’t.
Four Rules That Apply to Every Vehicle
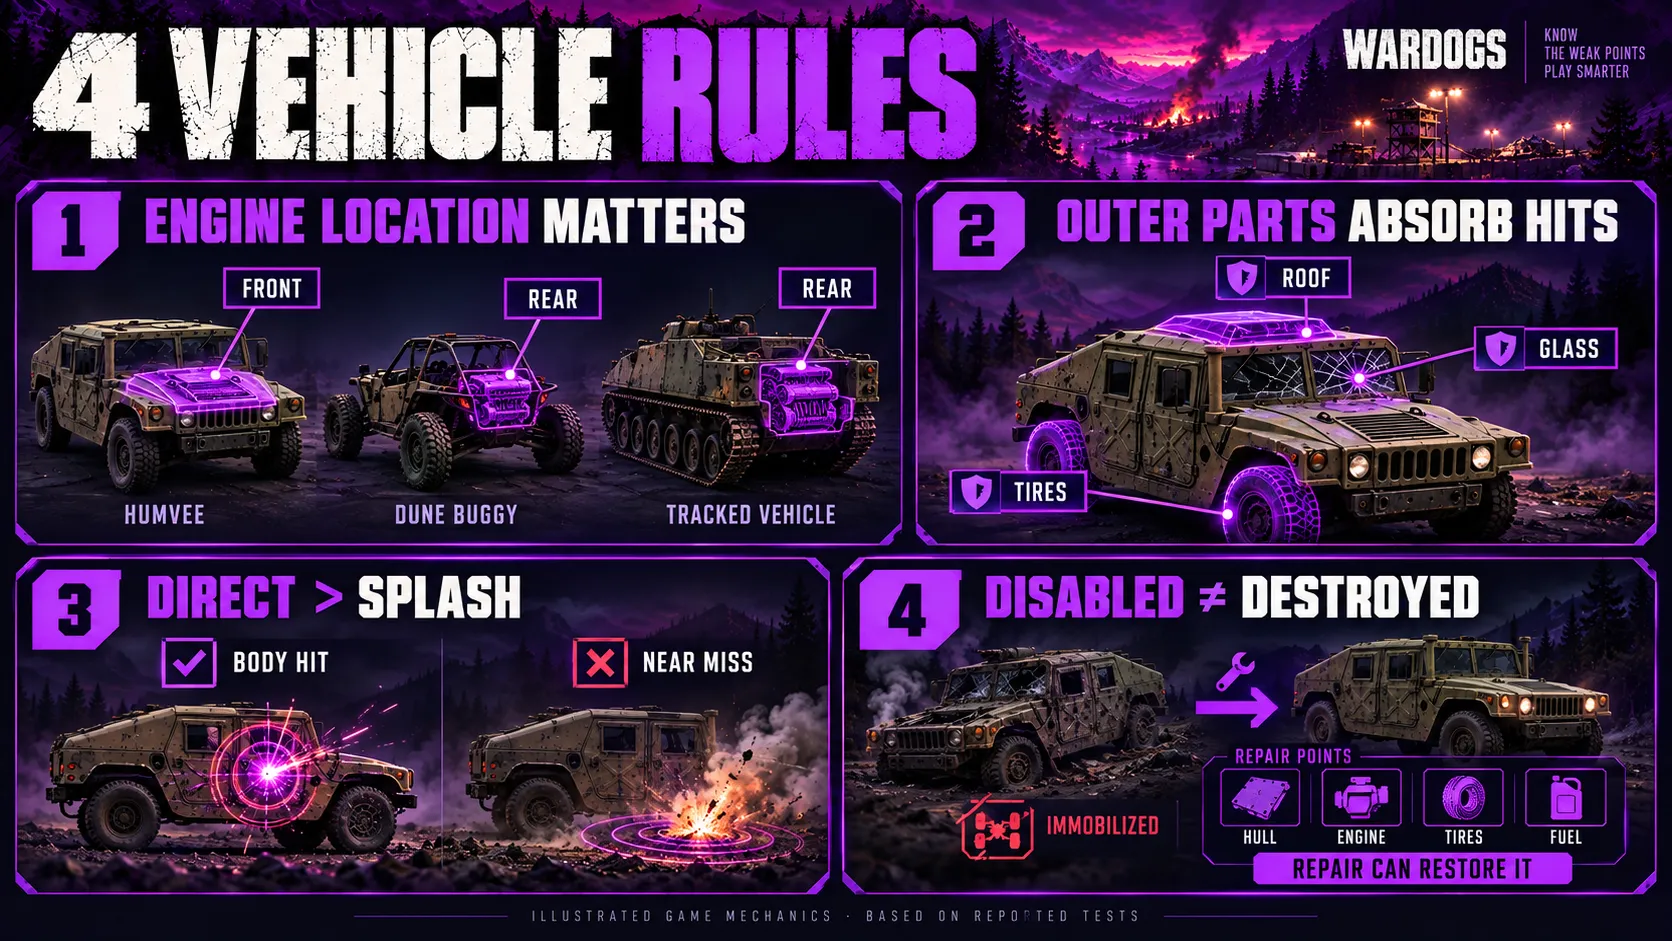
1. Aim for the engine. Every vehicle takes the most damage near its engine. Where the engine sits varies: the Humvee’s is under the hood, the Dune Buggy’s is at the back, and both tanks have theirs at the rear.
2. Tires, glass and roofs absorb hits. The creator found that RPG and MAAWS rockets striking a tire don’t trigger the kill you’d expect. The vehicle gets disabled and its engine gets wrecked, but it survives. Windshields, roof bars and the top of the hull behave the same way.
3. Direct hits beat splash. Rockets that land cleanly on the body get the inner-radius bonus. Near misses and hits on outer parts lose most of it.
4. Disabled is not destroyed. A crippled vehicle can be repaired, and every vehicle has separate repair points for hull, engine, tires and fuel tank. Finish the job before the crew climbs out with a repair tool, or you’ve spent your explosives for nothing.
Bobcat and Dune Buggy
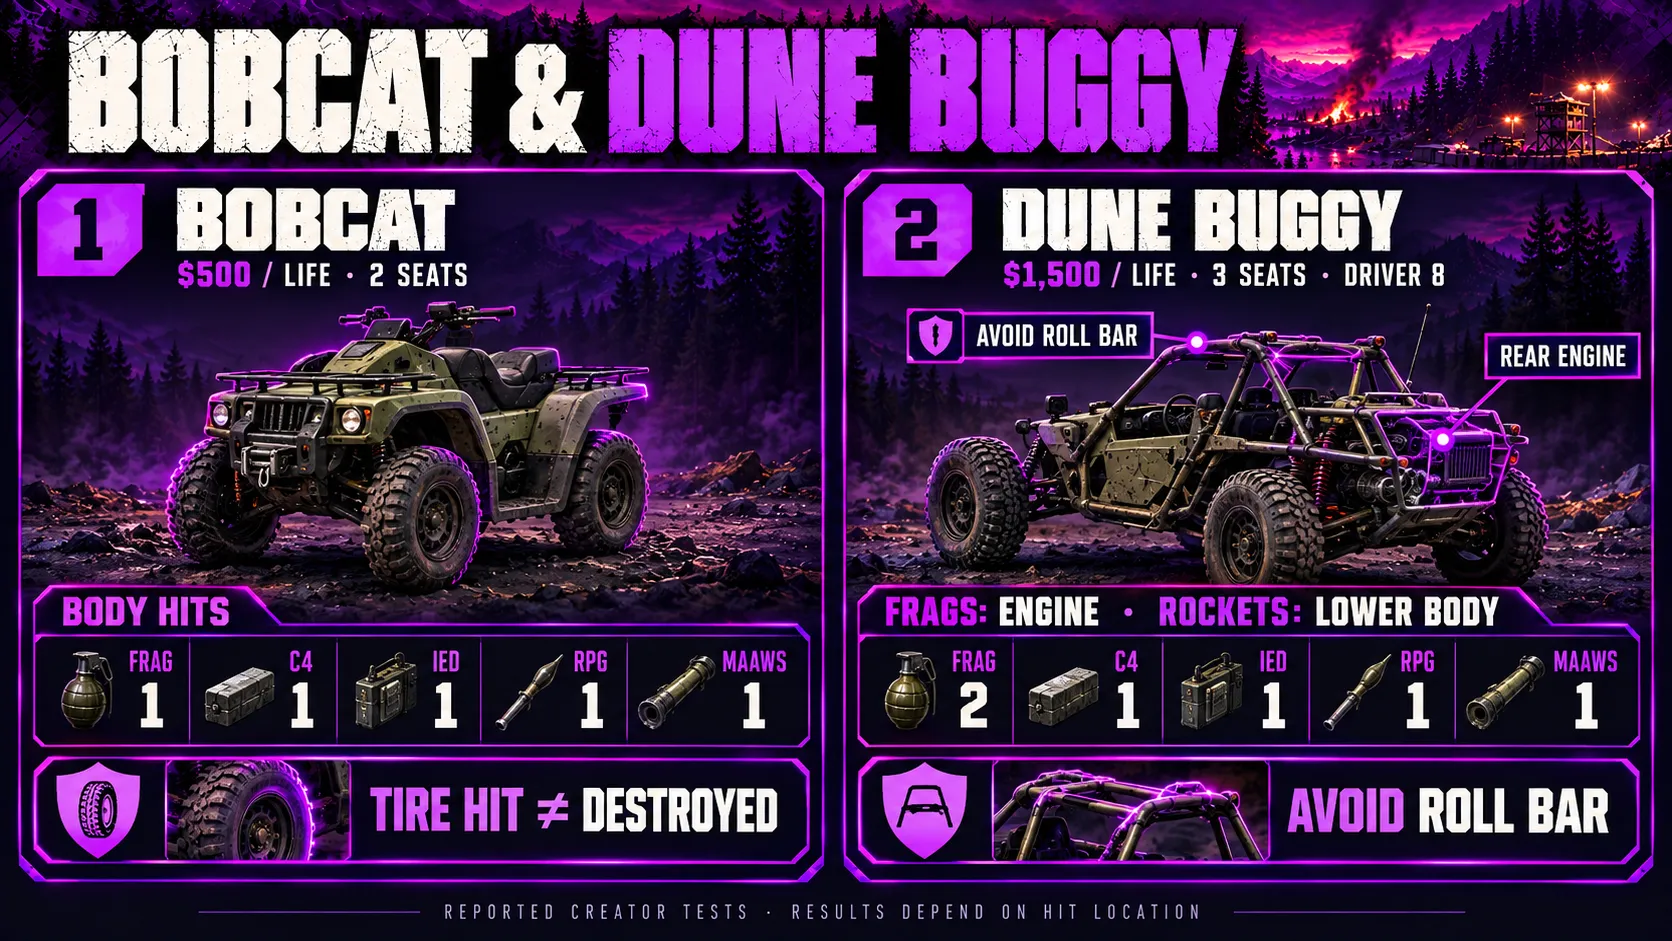
Bobcat
Price: $500 per life. Seats: 2.
The two-seat quad dies to one of anything: one frag, one C4, one IED, or one rocket on the body. The creator’s only reason to blow one up is the cash payout, since shooting the rider off usually works too.
The exception is the tire rule. A rocket into a Bobcat tire leaves it alive.
Dune Buggy
Price: $1,500 per life. Seats: 3. Unlock: Driver 8.
Slightly tougher, with the engine in the back.
- Frags: 2 good throws at the engine. The first one doesn’t even disable it.
- C4 / IED: 1 anywhere.
- RPG-7 / MAAWS: 1 on the lower body. A hit on the top roll bar left the buggy alive with some health, even though the engine sits right below it.
Kodiak, Kodiak Pickup and Kodiak M249
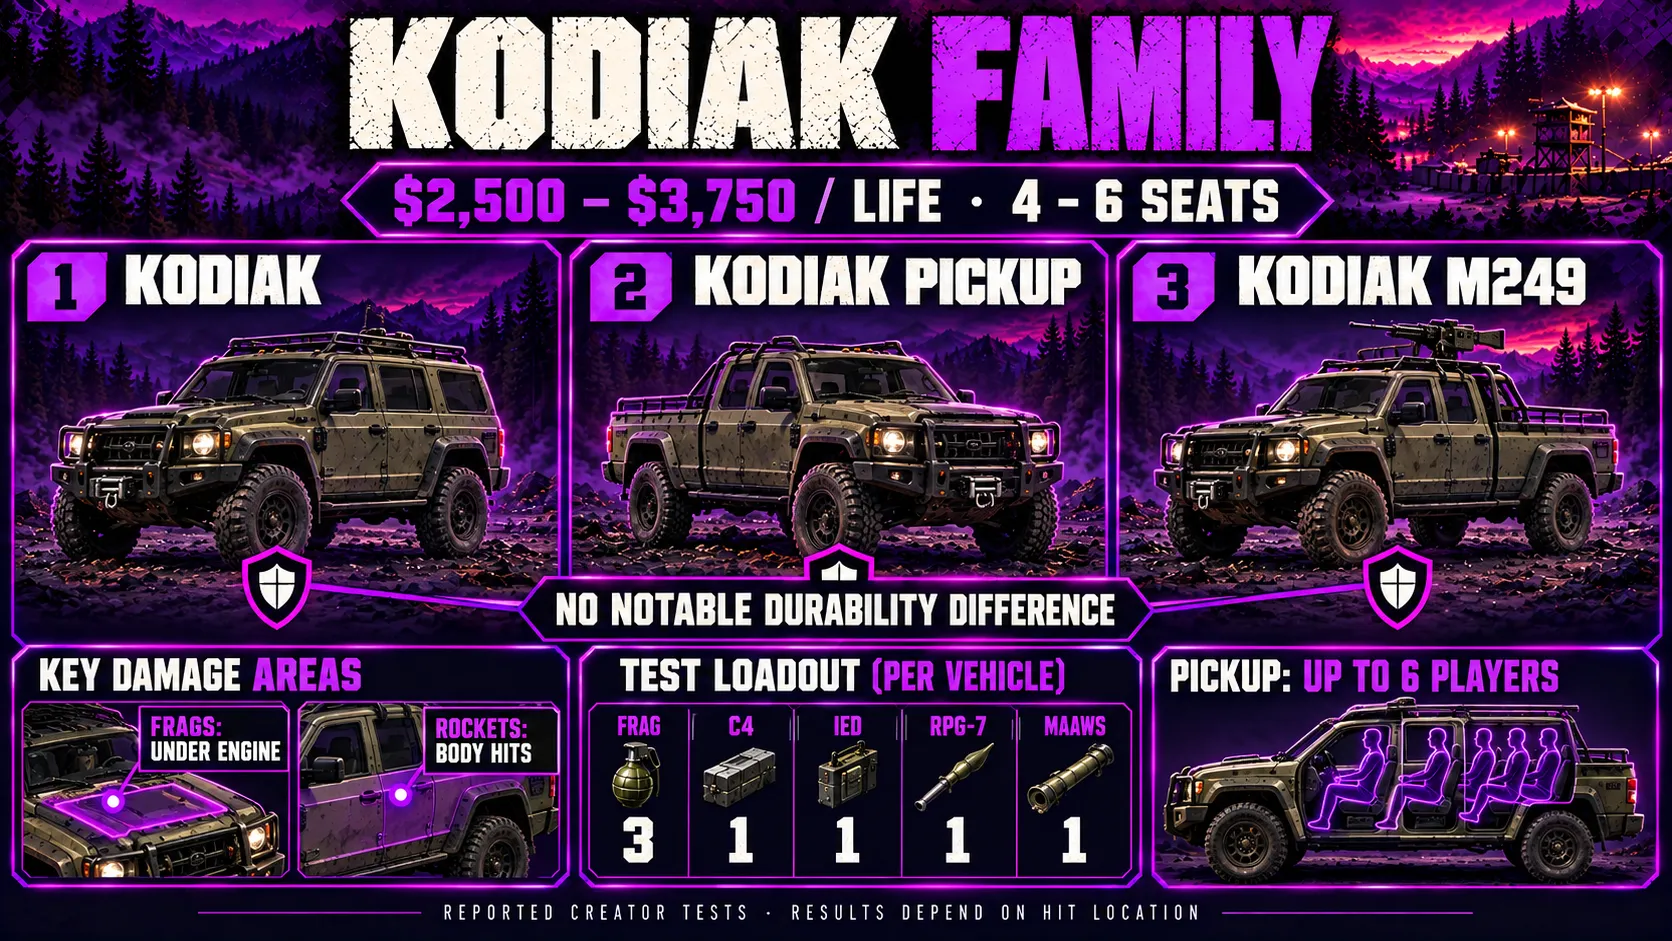
Price: $2,500 to $3,750 per life. Seats: 4 to 6.
The creator tested the base Kodiak, the Kodiak Pickup and the Kodiak M249 and found no noticeable durability difference between them.
- Frags: 3, landed under the engine. Anywhere else does much less.
- C4: 1, placed anywhere.
- IED: 1, even on the roof.
- RPG-7 / MAAWS: 1 anywhere on the body.
A loaded Kodiak Pickup can carry six players. With a launcher, that’s one of the easiest multi-kills in the game.
Humvee
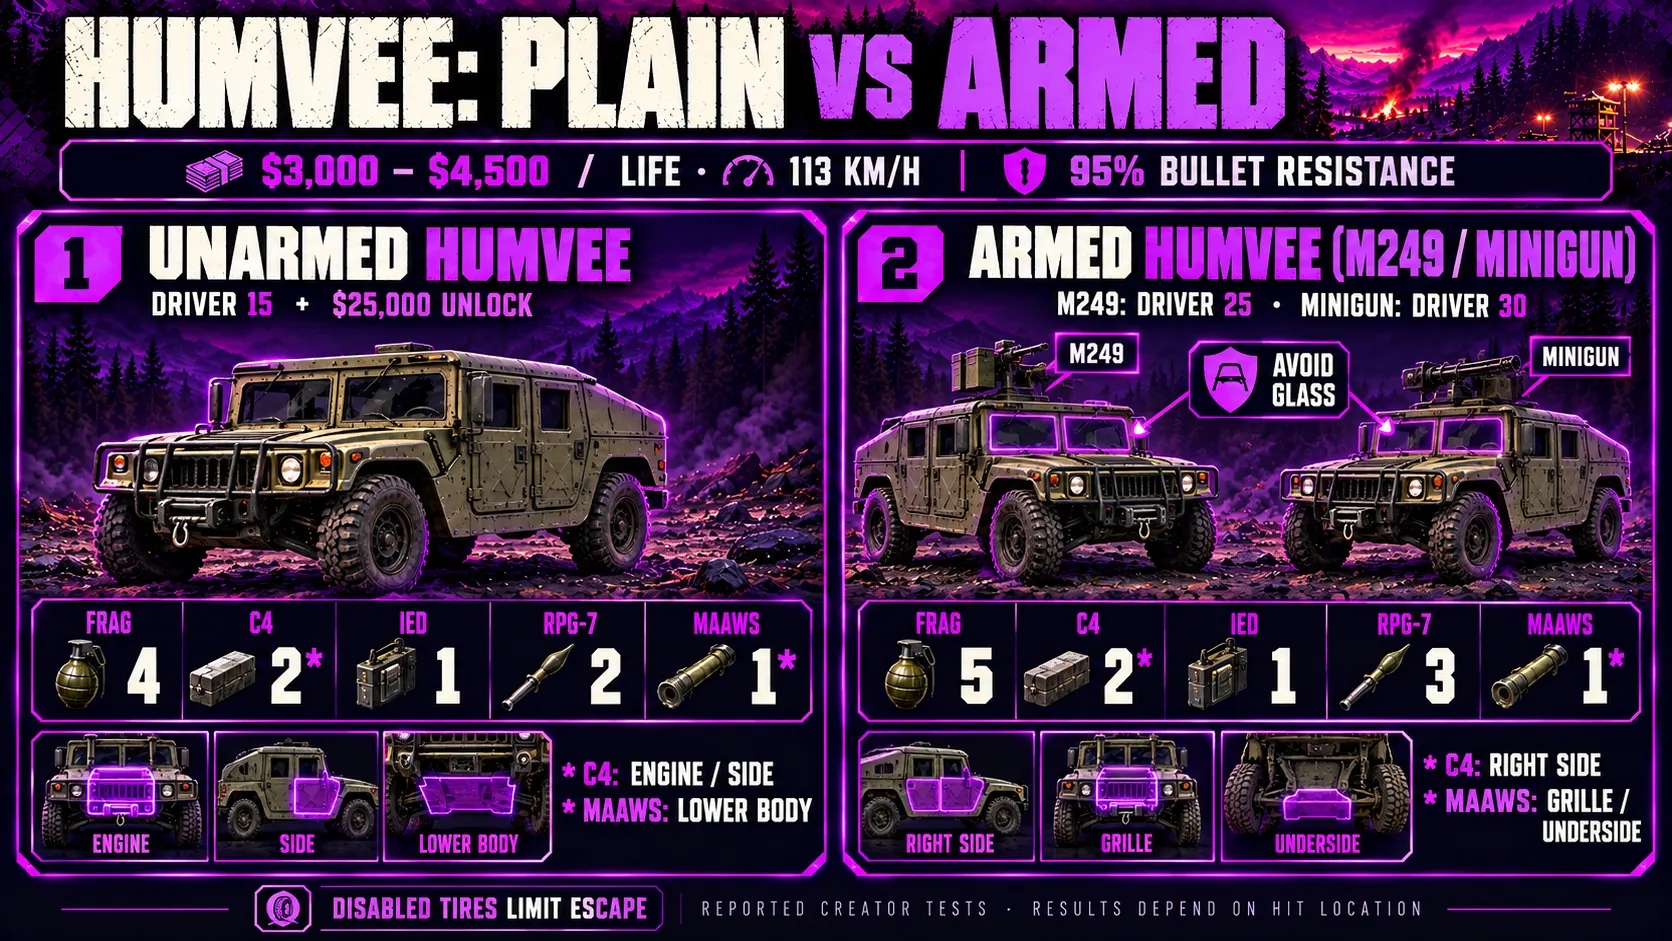
Price: $3,000 (unarmed) to $4,500 (Minigun) per life. Seats: 4. Top speed: 113 km/h.
The Humvee guide covers the full lineup, but the Humvee family is where most players first get frustrated. Small arms don’t go through the glass, and the game data gives the Humvee a 95% resistance to bullets. You can’t simply shoot the crew. Explosives are the answer, but placement matters more here than anywhere else.
Unarmed Humvee
Unlock: Driver 15 ($25,000).
- Frags: 4. A grenade landing straight under the engine did about 25% damage.
- C4: 2 on the engine (anywhere on the hood or front bumper) or 2 on the side. Elsewhere it took 3 or more.
- IED: 1, anywhere. Even the worst spot, the rear windshield, killed it.
- RPG-7: 2. No one-shot spot was found. Hit the lower body: doors, front, or near the fuel cap. The first rocket takes it to about half health.
- MAAWS: 1 anywhere on the lower body, including the front, doors and rear, even from bad angles. Just avoid the windshields.
A useful setup trick from the creator: shoot out the tires first. A Humvee on its rims is far easier to walk up to with C4.
Humvee M249 and Humvee Minigun
The armed variants carry more protection.
- Frags: 5. Four isn’t enough.
- C4: 2 on the right side, between the door and fuel cap. One charge does about half.
- IED: 1 anywhere, same as the unarmed version.
- RPG-7: 3. The creator found no two-shot spot from any angle.
- MAAWS: 1 into the front grille or aimed underneath the vehicle. Rear hits killed it sometimes and left it nearly dead other times.
The armed Humvees sit behind Driver 25 (M249) and Driver 30 (Minigun), so you’ll see more of them as a season goes on.
URAL, URAL Defender and URAL Defender M249
The URAL trucks are big, slow and surprisingly resistant to grenades and C4. The game data gives the base URAL a 55% resistance to C4, more than double the Humvee’s.
One advantage: according to the creator, the URAL cab is not bulletproof, so shooting the driver is a real option in a way it isn’t against Humvees.
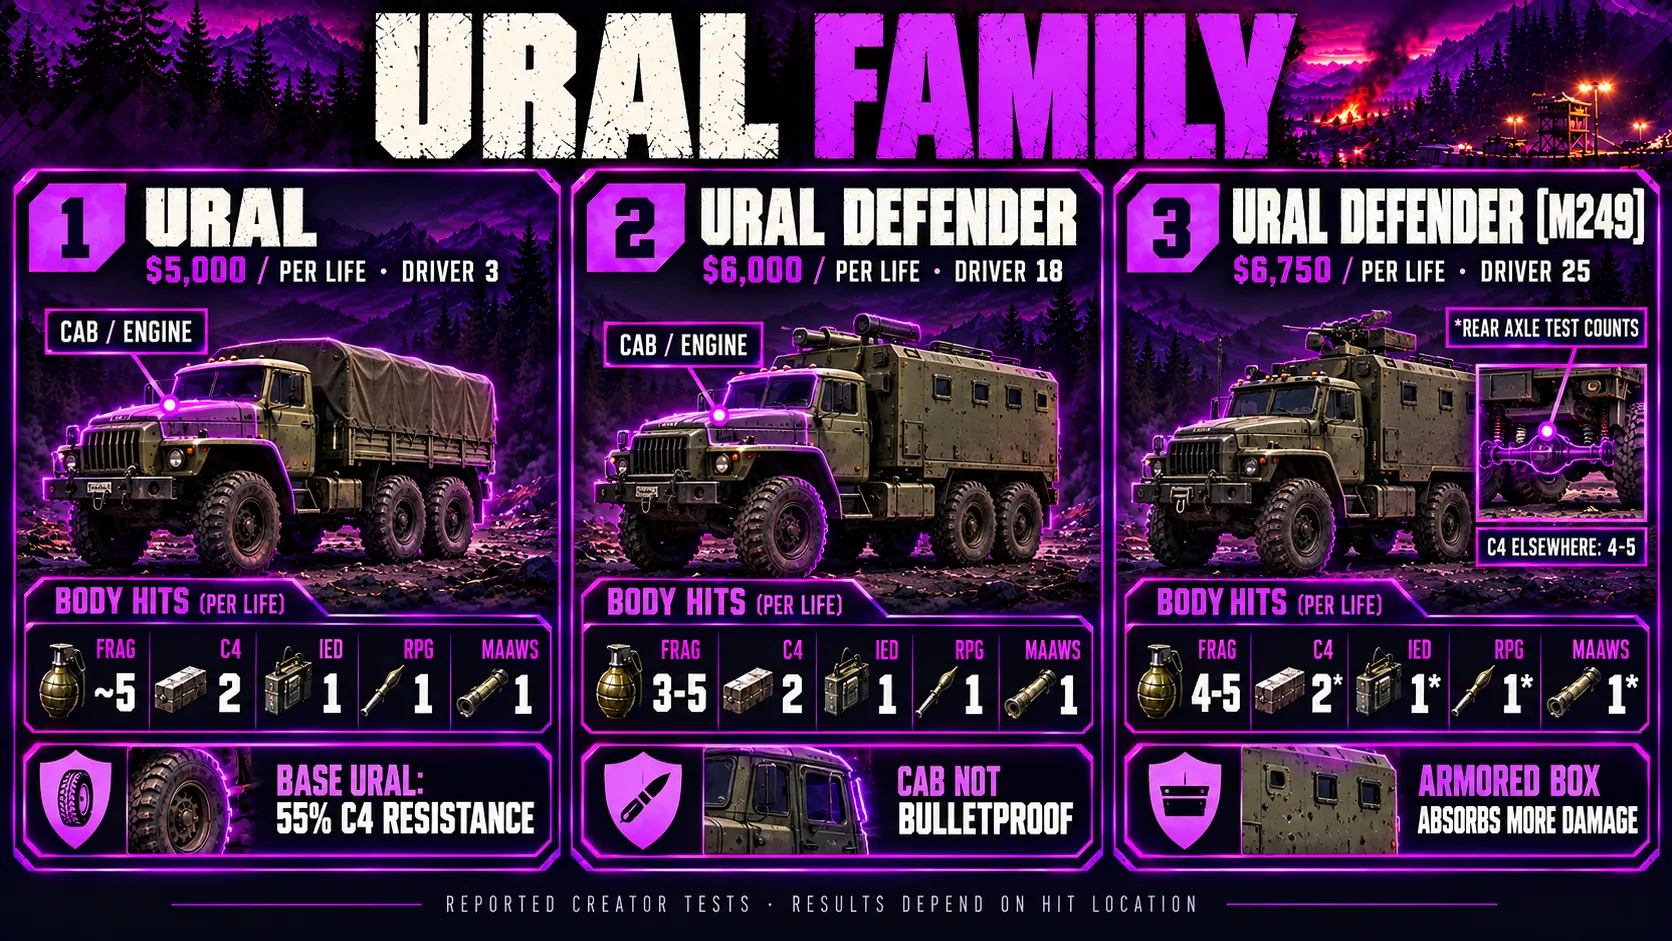
URAL
Price: $5,000 per life. Seats: 3. Top speed: 79 km/h. Unlock: Driver 3.
- Frags: about 5. The truck’s height makes grenades hard to place.
- C4: 2 almost anywhere along the fuel cap, sides or front. The splash is generous.
- IED: 1 on the left side, where it catches the engine, fuel tank and hull.
- RPG-7: 1 into either side’s door or engine. The left door was the creator’s most consistent shot, usually setting the truck on fire. Fuel tank hits were inconsistent. The spare tire, bed and windshield take much less damage.
- MAAWS: 1, with room for sloppier aim.
A URAL on a supply run often carries crates worth more than the truck. Killing it strands everything in the bed.
URAL Defender
Price: $6,000 per life. Unlock: Driver 18.
The armored-box variant plays almost identically.
- Frags: 3-5, inconsistent enough that the creator doesn’t recommend it.
- C4 / IED: same spots as the base URAL. One C4 on the side does about half.
- RPG-7 / MAAWS: 1 into the door, engine or fuel tank. The MAAWS was much more consistent than the RPG here.
Don’t target the armored box itself. It took two to three RPG rockets in testing.
URAL Defender M249: The Hidden Rear-Axle Weak Spot
Price: $6,750 per life. Unlock: Driver 25.
This is the toughest wheeled vehicle in the game, and the creator’s most useful find.
C4 on the usual weak spots takes 4-5 charges. But crawling under the back of the truck and placing C4 on the rear axle does enormous damage. Two charges kill it.
The creator reports this rear-axle spot works on every URAL, not just the M249.
- IED: 1 on the rear axle. Elsewhere it seems to take 2.
- RPG-7: 1 into the rear axle, which is hard to hit on a moving truck. Otherwise plan on about 2 into the doors or armored box.
- MAAWS: 1 into the rear axle. Otherwise aim for the cabin, doors and engine. The fuel tank on this variant seemed nearly immune, and the front windshield and bumper take minimal damage.
- Frags: 4-5.
SPH-2 Artillery Tank
Price: $8,000 per life. Seats: 3. Top speed: 65 km/h. Unlock: Career 90 ($500,000).
The SPH-2 reportedly moved to Career level 90 in the Season 1 update, so you won’t see many. When you do, it’s worth the effort: it carries one of the highest base destroy rewards in the game.
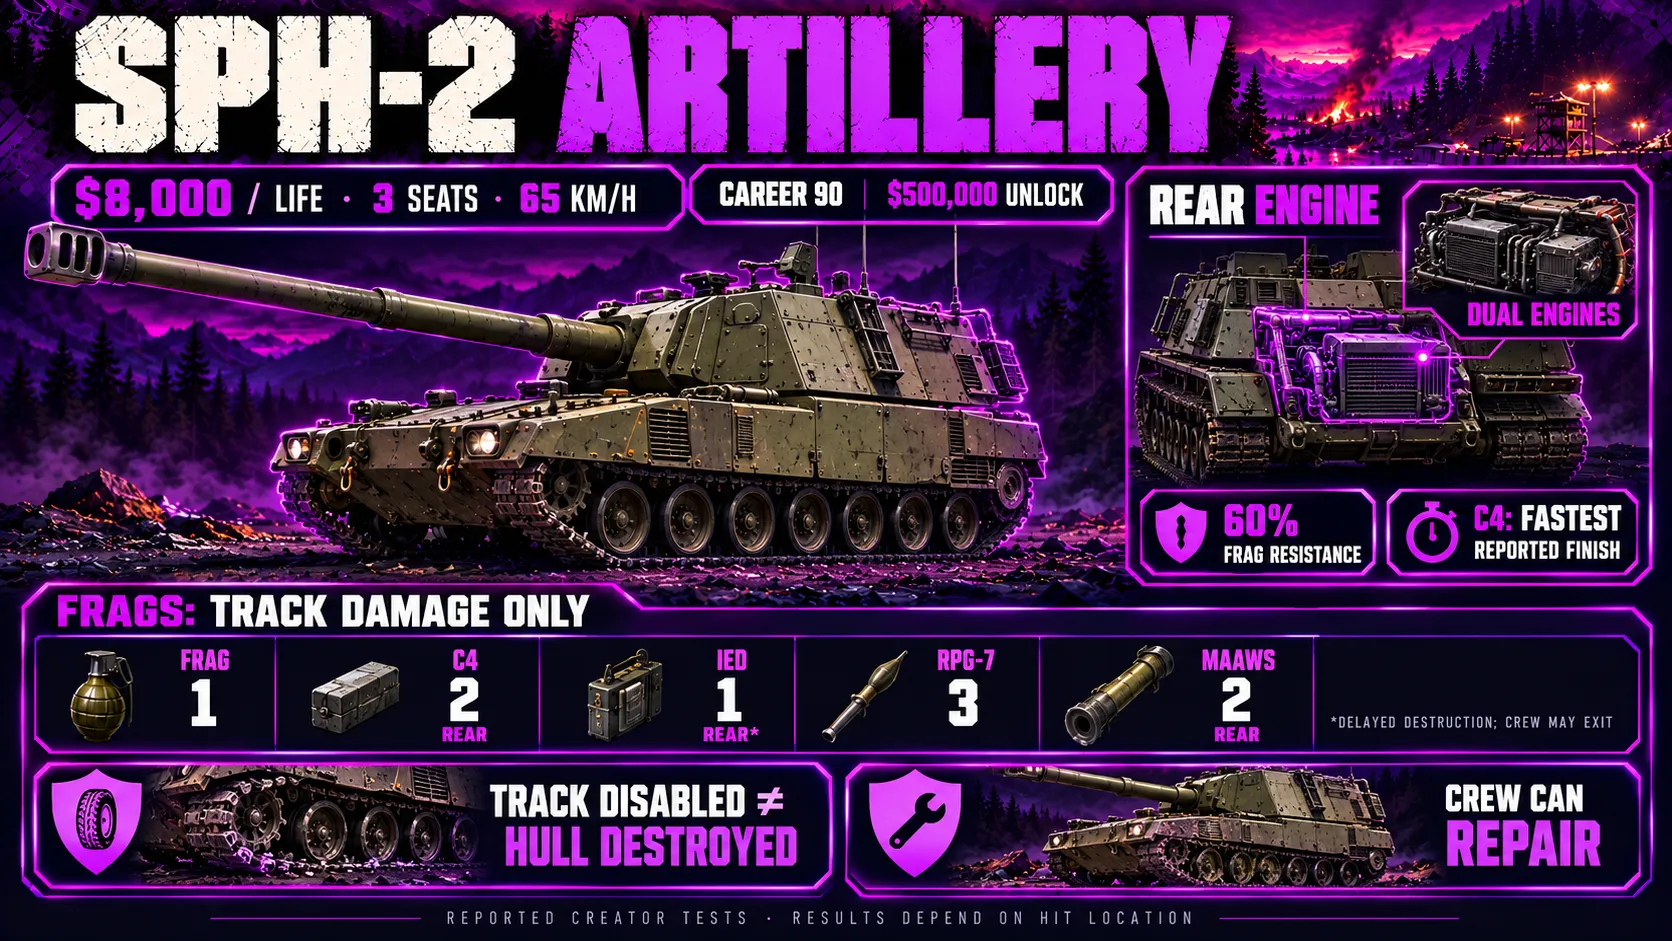
- Frags: effectively useless. The game data gives it a 60% grenade resistance. Four can take out one tread, for an assist at best.
- C4: 2 on the rear. One on the tracks kills the tread only.
- IED: 1 on the rear sets it on fire and it dies, but the crew may bail out and fight back. It’s also slow, since you’re standing there holding the phone detonator.
- RPG-7: 3. The first disables it without visible smoke. It uses a dual-engine setup, and a two-rocket strike leaves it crippled but still dangerous, with the crew able to repair it if they kill you.
- MAAWS: 2 into the rear. The first shot fully disables it.
C4 is the only real instant kill here, which means getting close. The IED is cheaper but leaves you exposed the longest.
L2A6 Tank
Price: $14,000 per life. Seats: 3. Top speed: 65 km/h. Unlock: Driver 35 ($500,000).
The L2A6 is the one vehicle where the front armor is a trap. It fully ignores bullets (a 100% resistance in the game data), and frontal hits do very little.
Like the SPH-2, it has two engines at the rear, and both must be destroyed for it to explode. The creator saw two separate engine icons when repairing it, and noticed the right engine repairs faster than the left.
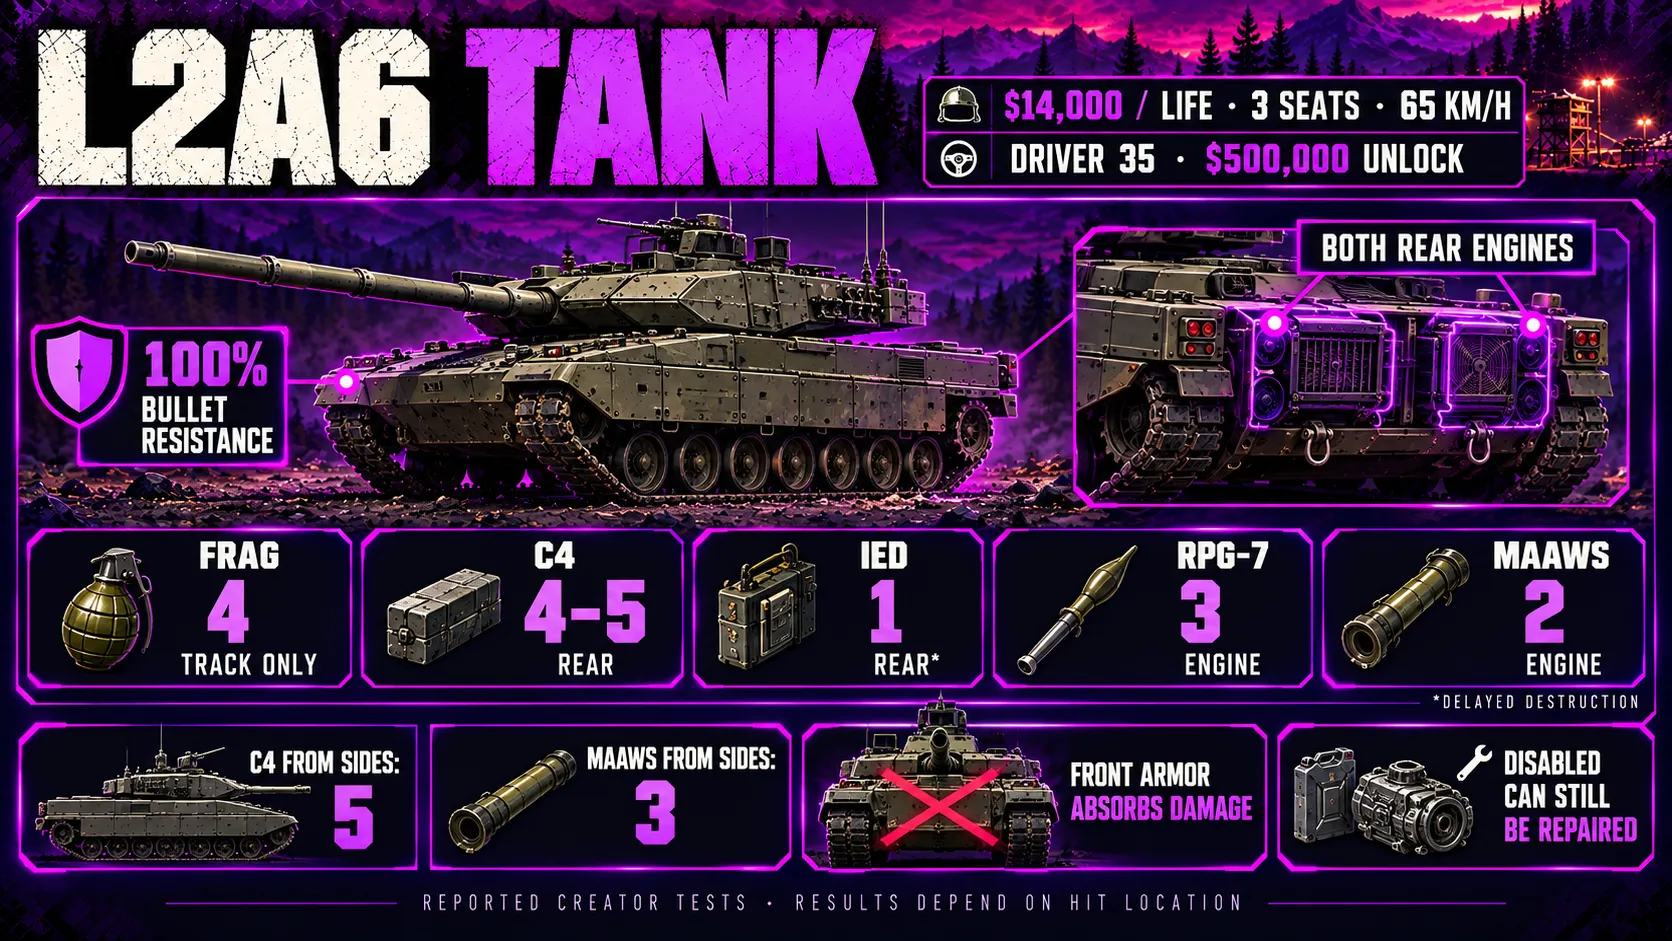
- Frags: 4 can break a track. Damage to the rest of the hull is negligible.
- C4: 4, split two and two across the rear engines. A fifth charge was occasionally needed. From the sides only, bring 5. One C4 disables a track.
- IED: 1 on the rear engine sets it on fire and the crew can’t save it. On the sides or front it does less than half.
- RPG-7: 3 into the engine. Other rear hits do very little.
- MAAWS: 2 into the engine, 3 from the sides. Turret hits can cost an extra rocket.
The skirt armor and fuel tank are destructible, but the creator found the engine is always the better target. One MAAWS to the engine leaves it heavily damaged, and repairing multiple modules takes the crew a long time.
A full crew matters too. The L2A6 seats three, and a crewed tank has a gunner watching while the driver repositions. A solo tank is the one to hunt.
What Destroying Vehicles Pays
Destroying enemy vehicles pays cash and Support XP. The payout scales with where the kill happens, per Dexerto’s reward data:
| Vehicle | Base reward | Control Zone bonus | Hot Zone bonus |
|---|---|---|---|
| Humvee | $500 | +120% | +140% |
| SPH-2 | $6,000 | +110% | +120% |
| L2A6 | $5,000 | +150% | +200% |
That puts an L2A6 kill in the Hot Zone at at least about $15,000, more than the tank cost to spawn, part of the wider WARDOGS cash economy. Dexerto doesn’t say whether the Control Zone and Hot Zone bonuses stack.
A few more details from the data:
- Neutral kills pay +25%. In a three-team match, the team you’re not fighting still counts.
- Assists scale with damage. Chip damage on someone else’s kill still pays a share, so a single rocket into a tank isn’t wasted.
- Friendly kills pay little or nothing. The reward drops by 75% to 100% for a team kill.
The creator reports SPH-2 kills paying around $18,000, which is more than the base reward plus the Hot Zone bonus alone. Treat that as one player’s observation, not a guaranteed number.
Cost vs Reward
| Kill | Explosives used | Rough cost | Base reward |
|---|---|---|---|
| Humvee with IED | 1 IED | $300 | $500 |
| L2A6 with IED | 1 IED | $300 | $5,000 |
| L2A6 with C4 | 4 C4 + detonator | ~$1,550 | $5,000 |
| L2A6 with MAAWS | 2 shells | $400 + $2,600 launcher | $5,000 |
The launcher costs are per life, not per shot, so a MAAWS that survives several fights pays for itself fast. The math is clear either way: tanks are the most profitable target in the game if you can reach the rear.
Tactics: Getting Close Enough to Use Them
Knowing the shot counts only helps if you survive long enough to use them.
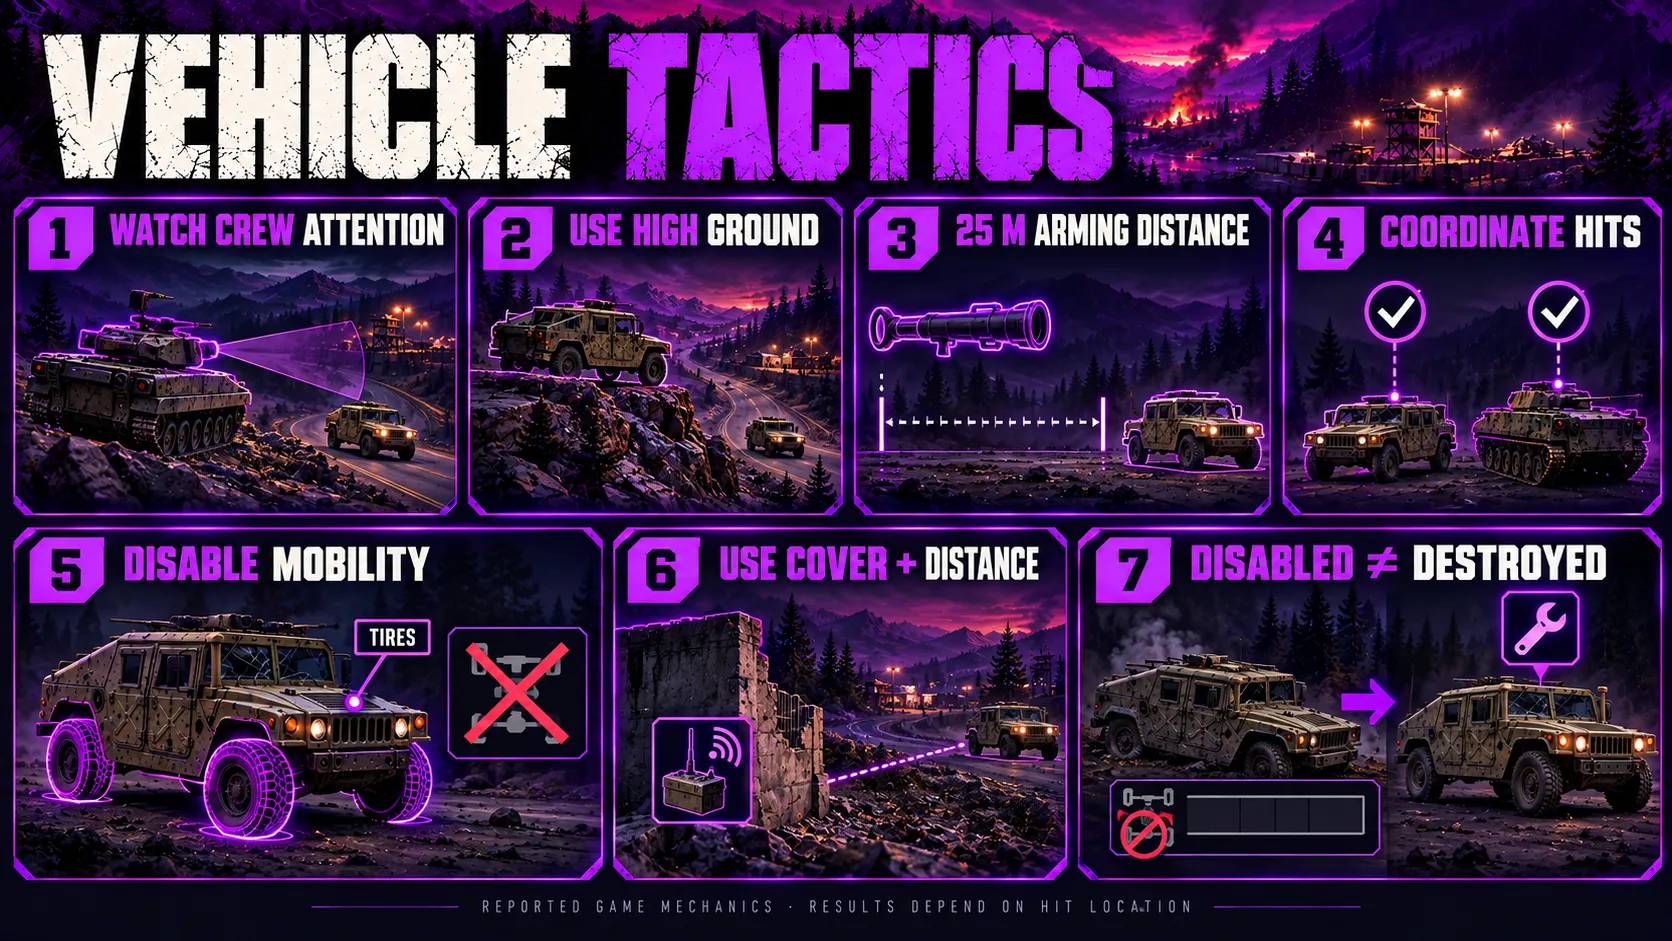
Hunt tanks that are busy. A tank firing at your team has its turret pointed away and its crew watching a different lane. That’s your window to reach the rear.
Use high ground. Tanks point their thickest armor at what they can see. A ridge or rooftop over a road gives you a clean look at the flank or engine deck, and crews struggle to elevate their guns onto targets above them.
Respect the MAAWS arming distance. The 84mm shell needs 25 m to arm. Point-blank shots in a compound or street won’t detonate.
Hit in the same window. Two rockets landing seconds apart kill. Two rockets a minute apart give the crew time to repair between them. Coordinate with a teammate.
Pop tires first. A Humvee or URAL on its rims can’t escape, and you can walk up with C4.
Get distance before the IED goes off. The IED uses a phone detonator, so you can put a wall between yourself and the blast. Just know the creator warns that holding the phone in the open is when you’re most exposed.
Finish disabled vehicles. A burning or immobilized vehicle is a window, not a kill. Stay on it until it explodes.
AT Mines, Drones and What Wasn’t Tested
AT mines weren’t part of the main test. The creator reports mines one-shotting everything they’ve seen roll over one, including an SPH-2 and an APC.
The creator hasn’t killed an L2A6 with a mine, so mine results against the main tank are untested here.
The AT mine unlocks at Support 25 and only triggers on vehicles, so it’s safe to lay on a road your own infantry walks.
Drones (the Stingray) carry the largest damage bonus of anything in the game data: +350% to +500% against every vehicle listed. They weren’t part of the creator’s testing, so this guide doesn’t give shot counts for them.
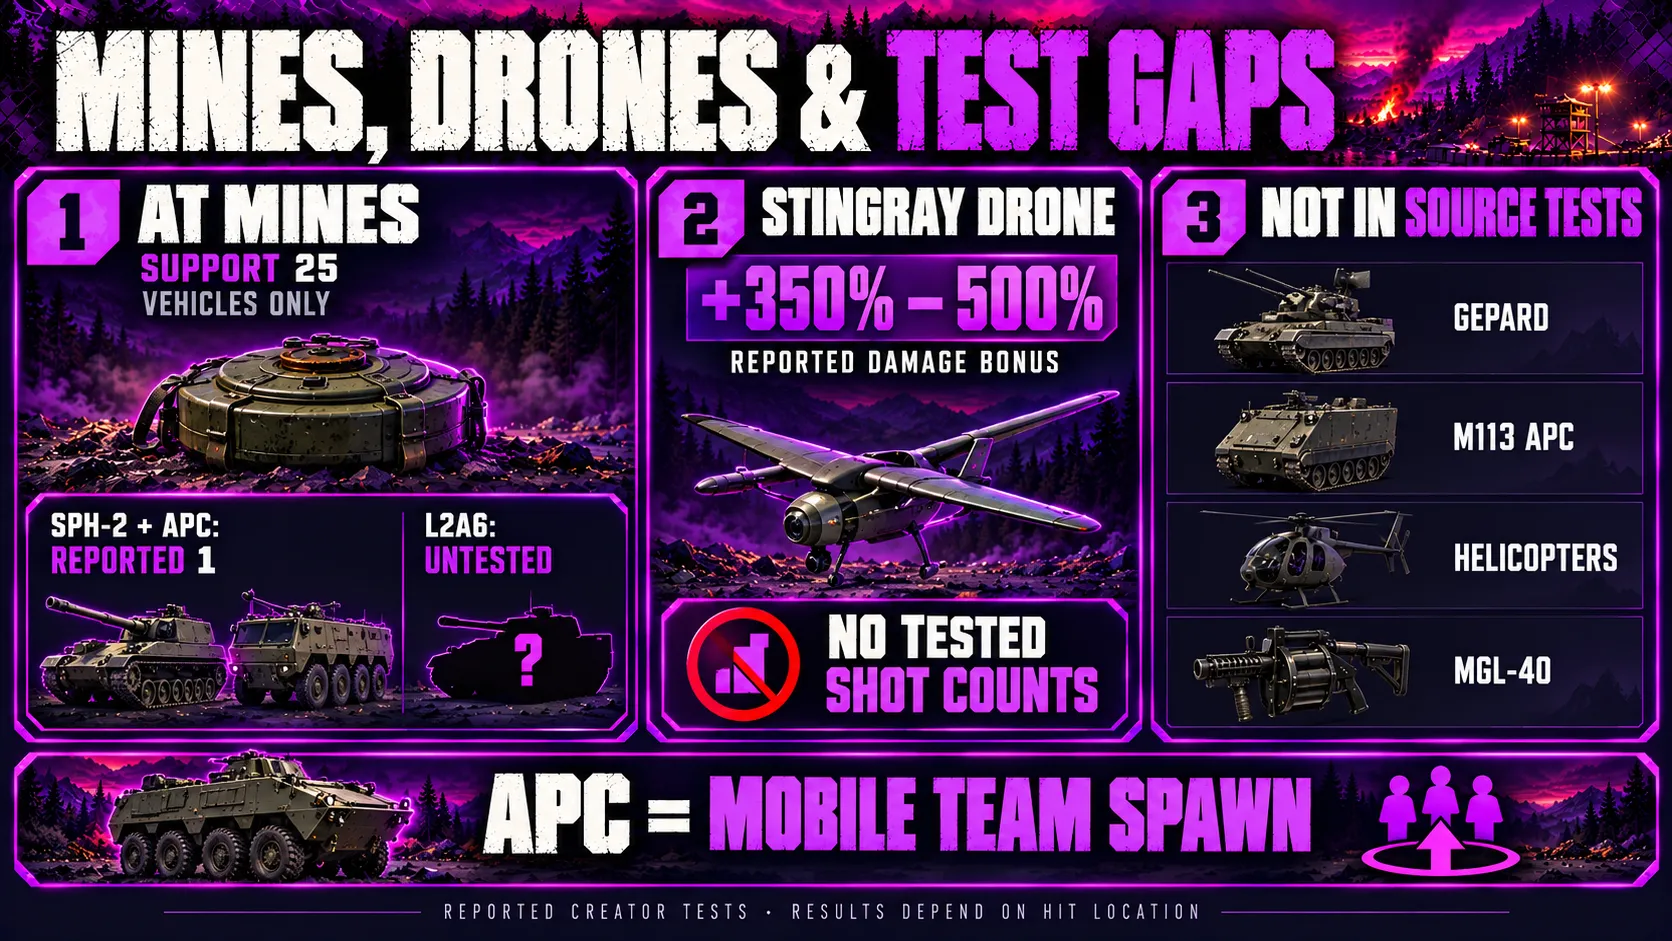
This guide also doesn’t cover the Flakpanzer Gepard, the M113 APC, helicopters or the MGL-40, because the source testing didn’t include them. Destroying an enemy APC is worth prioritizing, since it acts as a mobile spawn for the whole team.
Which Explosive to Carry
| Your situation | Carry | Why |
|---|---|---|
| New player, low Support level | 2-3 IEDs | One-shots nearly everything for $300 each |
| Support 5, mid budget | RPG-7 + 2 C4 | Range for moving trucks, C4 for Humvees |
| Support 20+ | MAAWS | Fewest shots on every vehicle |
| Hunting tanks | MAAWS or 4-5 C4 | Only way to kill from the rear fast |
| Lots of Humvees in the lobby | IEDs | +150% damage against Humvees |
| Defending a road | AT mines | Vehicle-only trigger; one-shot kills reported on the SPH-2 and an APC |
Every one of these is a per-life purchase, so a lost life means a lost kit, and the loadout rules guide explains why that hurts more than it would in most shooters.
Frags are a fallback, not a plan. The creator’s numbers show they only make sense against the Bobcat and Dune Buggy.
If you’re also cracking bases, the same C4 and IEDs double as breaching tools, and the base building guide covers how defenders try to stop them.
Common Mistakes
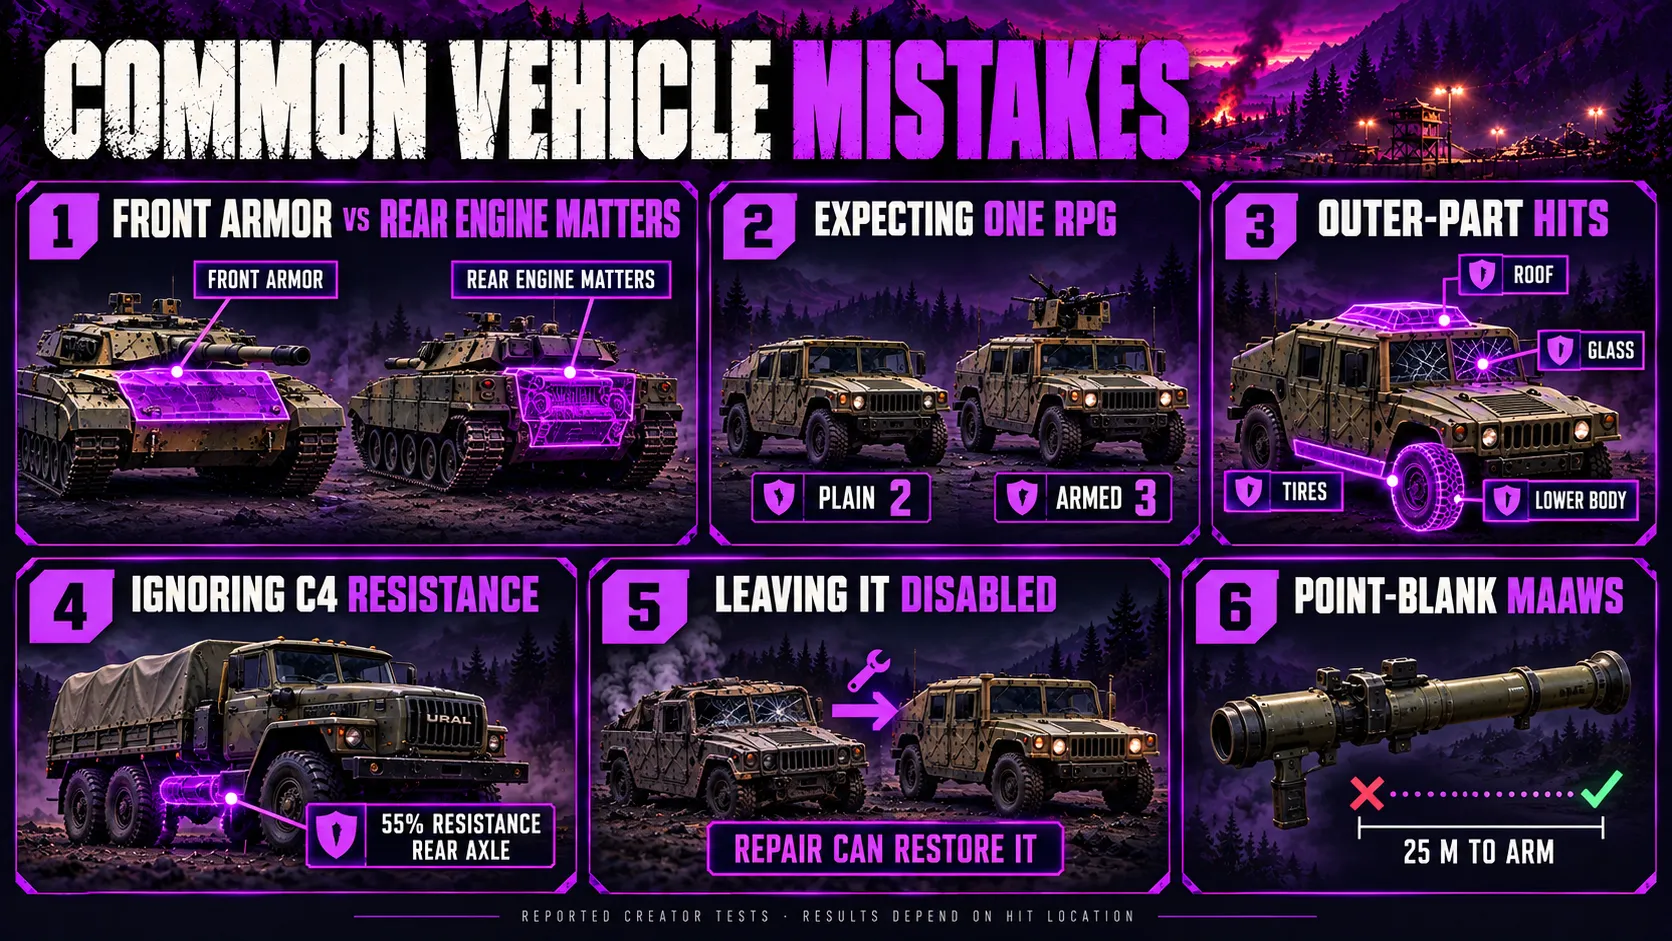
Shooting the tank’s front. The L2A6’s front plate soaks damage. Every range test points the same way: go round to the engines.
Firing the RPG-7 at Humvees and expecting a kill. It takes two on the unarmed version and three on armed ones. Carry an IED or wait for the MAAWS.
Hitting tires, glass or roofs with a launcher. These absorb the hit. Aim low on the body.
Stacking C4 on URALs. The truck resists C4 by 55%. Use the rear axle or bring an IED.
Walking away from a disabled vehicle. The crew repairs it and you’ve paid for nothing.
Point-blank MAAWS shots. Inside 25 m, the shell won’t arm.
Will This Change in Season 2?
Probably, at least partly. Season 2 launches October 15, 2026, and BULKHEAD’s Steam post says it comes with a progression wipe, so every unlock in this guide resets.
Equipment can also rotate out. BULKHEAD CEO Joe Brammer has said each season changes the order of progression, adds new weapons and vehicles, and rotates existing ones out.
The shot counts in this guide reflect the Season 1 build. Re-check them on the firing range after Season 2 lands.
Key Takeaways
- Aim for the engine on every vehicle. Tires, windshields and roofs absorb launcher hits.
- One IED kills almost everything for $300, thanks to large damage bonuses against wheeled vehicles.
- The MAAWS one-shots nearly every wheeled vehicle and kills both tanks in two rear shots.
- The RPG-7 can’t one-shot any Humvee. Plan on 2 for the unarmed version and 3 for armed ones.
- Every URAL has a rear-axle weak spot: 2 C4 or 1 IED under the back.
- Tanks need 4 C4 split across two rear engines.
- Tank kills pay the most, at least about $15,000 in the Hot Zone.
- Kill disabled vehicles fast, before the crew repairs them.
FAQ
What is the best explosive for destroying vehicles in WARDOGS?
The MAAWS. In one creator’s testing it one-shot nearly every wheeled vehicle when aimed at the body and killed both tanks in two rear shots. It unlocks late, at Support 20, so the $300 IED is the best value option before then.
How many C4 does it take to destroy a tank in WARDOGS?
Four C4 split two and two across the L2A6’s rear engines, according to one creator’s range tests. A fifth charge was occasionally needed. From the sides, plan on five.
How many RPG shots does it take to kill a Humvee?
Two for the unarmed Humvee, aimed at the lower body, and three for the M249 and Minigun variants. No one-shot spot was found on either. The game data gives the Humvee a 70% resistance to the RPG-7’s 93mm rocket.
Can one IED destroy a tank in WARDOGS?
Yes, if it goes on the rear engine. It sets the tank on fire and the crew cannot save it, though they may escape. On the sides or front it does less than half the tank’s health.
Why does the IED kill a Humvee in one hit but C4 needs two?
The Humvee takes 150% extra damage from IEDs and resists C4 by 20%, according to damage resistance data published by Dexerto. That gap is why a $300 IED outperforms C4 on most wheeled vehicles.
Where is the weak spot on a URAL?
The doors, engine and fuel tank area on either side. On the URAL Defender M249, the creator found a hidden weak spot under the rear axle, where two C4 or one IED kills it.
Why didn’t my RPG destroy the vehicle?
You probably hit a tire, a windshield or the roof. Those absorb launcher hits and leave the vehicle alive. Aim for the lower body and engine instead.
Do frag grenades damage vehicles in WARDOGS?
Yes. One kills a Bobcat and three kill a Kodiak when they land under the engine. Against Humvees and URALs they take four to five, and they barely scratch tanks.
Do AT mines one-shot vehicles?
The creator reported one-shot kills on the SPH-2 and an APC. Mines weren’t tested against the L2A6.
Is the RPG-7 or the MAAWS better against vehicles?
The MAAWS kills in fewer shots against everything and is more forgiving on aim. The RPG-7 unlocks much earlier and costs less, and it still one-shots light vehicles and URALs.
How much money do you get for destroying a tank in WARDOGS?
The L2A6 carries a $5,000 base reward, raised by 150% inside the Control Zone and 200% inside the Hot Zone, based on Dexerto’s reward data. Assists pay a share based on your damage.
Can you shoot the driver out of a Humvee in WARDOGS?
No. Humvee glass stops small arms. The URAL’s cab is not bulletproof according to the creator, so shooting its driver is a real option.